Saturday, February 26, 2011

Return of the Porcupine Boat . . . or the joining of the hull and deck

Today was a milestone. I finally joined the hull to the deck and now have a complete boat - of sorts.

After some interior preps, i.e., adding a second coat of epoxy on the bulkheads and such, I was ready to finally mate the deck to the hull.

I bought some new wire at Princess Auto - 18 gauge with a green poly covering. About 3.00 for 30 meters = a dandy deal!

2x4s on edge provided enough room to loosely fit the wires.


Cheryl doing the "twist"


Things went together nicely. A few hiccups involving clamps but all will be fair in the end.

Tomorrow we remove the sutures and all will be be revealed.


If I may say so, day-um this is one nice lookin' craft.

Friday, February 25, 2011

Scantlings and the "expedition boat" ...

Scantlings . . . explains the structural strength through girders and I-beams in a particular section and scantling length is considered as structural length of the ship.


Many years ago I completed the first year of Naval Architecture at, what was then known as, the "Cod College". If there are two concepts that have stuck with me, they are "scantlings" and "Lloyd's Rules". If memory serves me correctly (and I'm not using Google here), to be considered insurable by Lloyds of London, ships had to have proper scantlings according to their size and application. I doubt that Lloyds was ever called upon to insure a kayak but I'd like to think that my new boat would fit the criteria!!

When building a boat there is a fine line between weight and strength. Are you willing to sacrifice weight for strength and vice versa. In researching my boat, I've found the term "expedition boat" often used to describe one that is made a bit more durable, often at the expense of lightness. Not being one to be THAT hooked up on weight, I've opted for the stronger vs lighter.

Case in point. Last night I installed the bulkheads. Tonight, the decision was how to strengthen them. The options were - a) fillet them in and then epoxy the surfaces for waterproofness b) use fillets and glass/epoxy the surfaces for waterproofness or c) use fillets and then glass the whole lot AND tape the seams!  I opted for "c" and filleted and glassed ALL bulkheads on BOTH sides and ran a 6oz tape around BOTH perimeters of all bulkheads. Excessive some may say but for the sake of those few ounces of cloth, tape and epoxy, I know that this an "expedition boat"

FWD bulkhead - 6oz glass on both sides, filleted and taped with 6oz tape.

 Rear bulkheads - 6oz glass on both sides, filleted and taped with 6oz tape. 

Having completed this, somewhat arduous task, I am now ready to fit the deck!!

Fittings, bulkheads and decisions . . .

I've decided to forgo buying deck fittings and go with a system attributed to Joe Greenley at Redfish Kayaks. According to legend (just kidding) Joe came up with an idea of using nylon webbing to hold deck lines and bungees - as per these instructions. I like the idea of soft pad eyes and the fact that I can put these on the boat after I finish painting.

I added reinforcing under the deck in spots where I plan on putting a pad eye.


A test pad eye. Easy peasy!!

I also cut and fitted the three bulkeads. I've got them filleted for now but I just read that I should glass the fillets as well. That will have to wait until tomorrow.


As it stands right now, the only thing between me and stitching on the deck is that glass tape for the bulkheads. I can do the taping and then proceed to do the deck even before the epoxy/glass on the bulkheads has dried!!

For a day or two I agonized over whether to install a skeg or not. At one point I had myself convinced I needed one and even had the plans drawn up to make it. Then I had a change of heart and decided against it. This change of heart was prompted when I looked at my keel and saw a total of 4 layers of 6oz glass, tape, fillet and epoxy!! I'd need a chainsaw to get through it.

I did some further research on the matter of skegs and came across the expected arguments for and against. The deciding factor was a little nugget I found on the Kayak Building Forum. Apparently somebody asked the exact same question as me sometime before. I read with interest the responses. The one that really tweaked was the comment that "if the designer does not include a skeg in the design, then there is probably no need to have one"  As far as I know Duane Strosaker designed the Point Bennett as a skeg-less craft. ( I stand to be corrected and, Duane, if you're reading this, please feel free to jump in) I also checked other people's builds of this craft and all, save one, appear to be sans skeg. I am willing to try the boat without the skeg and, if if does not work, I can retrofit one relatively easy.

In the meantime, I hope to join the deck and hull this weekend.   Woohooo!!

Sunday, February 20, 2011

Schedule 40s and other things . . .

There's an old adage in woodworking (and boatbuilding) circles that you can never have too many clamps. My next task was the gluing the hatch spacers to the deck. This would require a substantial number of clamps if to be done correct. I'll admit that my clamp inventory is somewhat lacking. I have a few old c-clamps, some plastic spring clamps and a few bar clamps. And that's it. But, in Moores and Rossel book,  Kayaks You Can Build, (rapidly becoming my Bible) they briefly discuss the use of clamps made from ABS pipe (Schedule 40 is stamped on the side, so hence the name) Simply cut a 3" pipe into 1" sections, then split the ring.  The result looks like this:


Surprisingly, the ABS pipe really wants to retain its original shape so there is a fair bit of holding power. Of course, you are using a bigger number of these clamps which increases the holding power. Also, we're dealing with epoxy and a great deal of pressure is not required - lest we end up starving the join!!

$15.00 of pipe yielded 50 Schedule 40 clamps.

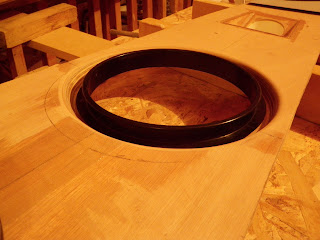
The first use of the new clamps was the gluing of the coaming lips to the spacers. As shown below.


The next step was one that I was both eagerly anticipating yet almost dreading!! I had to cut the holes in the deck for the hatches. I've cut holes in my plastic boat for both a bilge pump and an underdeck hydration system but nothing as drastic as cutting a 16x12 gaping hole!!! I followed the old rule of measure twice, cut once because a wrong cut would mean a MAJOR setback. My camera went missing during the cutting process but all went without incident. I left the holes a little small so that I could enlarge them in a more controlled manner as required.

I used the Schedule 42 clamps again when epoxying the spaces/lip to the underside of the deck. In the images below I only have a few clamps on each piece. I later doubled these amounts.

Rear and day hatch.

Fwd hatch showing compass recess.

That's a lot of clamps!!

Since I was cutting holes for the hatches, I figured I'd do the compass recess while I was at it. Again the camera was AWOL but I do have pictures of the recess in place. Again, I cut the hole too small and used a rasp and sandpaper to slowly bring it to a perfect fit. I will fillet the underside for added strength.


I glued the spacers in on Sunday AM and left them for the day to dry. Later in the evening I decided to take the clamps off. Of course this lead to some "experimental" sanding and cutting to see how how hard it will be to get a neat looking job. It was not a daunting task at all. The 4 mm deck is easy to cut and shape. I set to the front hatch and after about 30 minutes I almost had a final product.

After some shaping.


Coaming laid in place.

Coaming and hatch laid in place.


It was getting near bedtime for the rest of the family so I decided to lay off the sanding and call it a day. I wanted to get an idea of how the whole project was looking so I popped the deck back on the hull and here's what it looks like thus far. I'm a happy builder!!


Saturday, February 19, 2011

All Decked Out - the 4th step

Friday night was an easy night. My son had an out-of-town b-ball game (they won) and we did not get home until 9:00. I did not get to work on the boat until 9:30. No biggie. I was only planning on glassing the underside of the deck.

As per the plans, I ran another strip of 6 oz tape up the inside of the foredeck seam and then glassed and epoxied the whole lot. Total time was less than 1 hr! For once, I am happy to say that nothing went awry during this whole thing!! Finally!!

Bow to stern

Stern to Bow. Hull to the left just waiting!!

Soul mates waiting to be forever joined!!
I'm going to apply one more relatively thin coat of epoxy and then I'm ready to do some cutting.

After that, the next stage is cutting the hatch "holes" and the installation of everything you see in the image below.

Spacers, coamings and hatches

Time to kick back and have a beer before hitting the hay. Another b-ball game in the AM!!

Thanks for dropping by!

Friday, February 18, 2011

All Decked Out - the 3.5 step

Tonight saw a continuation of last night's project, i.e, cutting the hatch spacers and working on the compass recess. I completed all three hatch spacers - to my satisfaction, at last!! I ended up cutting one of them three times. Did I mention before that I am anal retentive?!?!? Well, they are all cut now and waiting to go.

I decided to drop the deck on the hull to see how things were fitting. Things are looking really good. The deck is going to require very little extra fairing. Once I start stitching the deck to hull, it should really start to come together. The exercise of popping the deck on the hull was to get an idea of hatch placement. This a pretty narrow craft and it's going to take some finagling to get them all to fit but I've got it all cased!!

Deck on and held in place with push pins.
I was trying to connect the deck and hull by using masking tape but it did not have the holding power so I opted to use push pins. I pushed them down through the deck and into the top of the sides. I am sure some purist will find some problem with this but it works great. Plus I can work on fairing the sheer as the pins are not in the way!!

Hatch placement is pretty well figured out - just a few things to keep in mind like bulkhead placement.


In my last post I was ruminating about how to encase the back of the compass recess. Today, while at Home Depot I came across a cap that is used on white PVC drain pipe. It says it's for 3" pipe which I take to mean 3" ID as the OD was 3.25 or exactly what I needed!!  At $1.75 it was worth the risk of buying it to see if it would work out!!! And it did!!! I was planning on constructing a custom backing out of FG and epoxy but when an easier way presents itself, I am not one to ignore it!!!   I initially tacked the cap onto the compass recess using hot glue and did some test fitting. You decide - does it look good, or what?


Compass recess with ubiquitous beer can in the background!!

And again!


I've had success with epoxying plastic before but it's a bit dodgy at best. I had some West System G-Flex on hand but never had a chance to try it. G-Flex is designed for use on plastic and other hard to glue surfaces - and in a marine environment to boot!! G-Flex is a 1:1 mixing ratio and it puts you in mind of the cheaper epoxies by Lepages that you can buy at CTC. It's pretty gooey during the mixing stage and, for some reason, it smells like a barn - weird!! I figured that since I'm gluing a piece of PVC, I'd give the G-Flex a whir. I sanded the PVC and gave it a quick cleaning with some acetone. I added some 406 filler to make the epoxy thicker to keep it in place. G-Flex + filler = a very yellow epoxy. I ran a thick fillet around the PVC. No need to worry about looks as this will NEVER be seen once installed on the boat. Curious to see how this stuff sets up!!


And just a few shots showing what the finished product will generally look like.


Hatches laid in place - they will be recessed much more than this once installed.


Next will be glassing the underside of the deck.

Cheers.

Thursday, February 17, 2011

All Decked Out - the 3rd Step

Last night was supposed to see some good progress on my hatches and compass recess. As I've pointed out before, Duane Strosaker provides only the rudimentary intsructions for building this boat. His intent is to provide the builder with the hull and deck shape. The rest is for a) the builder to decide and b) the builder to come up with the process to make those decisions come to fruition.

I've decided to go with commercial rubber hatches because a) it's easier to install them than to make custom ones b) they are very watertight and c) I think they look better (but that's just me!!).  I've seen pictures of other boats where the builders simply stuck the hatches on top of the deck. They stand out like chimney stacks from the deck of the boat. Not wanting that look nor the hatches getting in the way of rescues and such, I 've decided to go with recessed hatches.

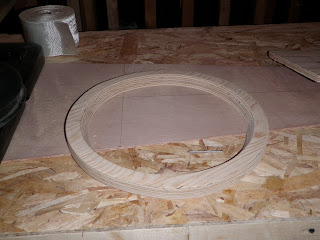
I'm going to use 3/4 plywood rings as spacers that will allow me to drop the hatches and have the tops just slightly above the deck. The spacers will be epoxied up under the deck. A lip of plwyood will be epoxied to the bottom of the spacer. The hatch coaming will be bolted to this lip. Here's what I came up with.


Having no plans means that there is a certain degree of trial and error. I ended up cutting three extra, i.e., WRONG, spacers before coming up with the one I liked. Initial tests had the sides up and down pefectly vertical. To do this meant that the opening had to be pretty big because you need to get your fingers in around the hatch to put it on/take it off. I toyed with the idea of bevelling the sides but I did not think that my jigsaw could accurately cut the sides at an angle. To to my delight, it cut smoother and with better control with the blade set at around a 35 degree angle.

After a few hours and lots of plywood dust, I finally came up with a spacer that was up to snuff.


The hatch will actually sit lower then this.


While it took a while to create this one spacer, the rest will come quicker as I now know a) what dimensions are required and b) what cutting processes are to be followed.

Making the spacers brought me up to 11:00 but I still wanted to get to work on the compass recess. As I was making it out of 4mm plywood, I knew I could cut the materials with a razor blade knife and not make enough noise to keep people awake. Using a cardboard mockup I made the other night, I set to cutting. 4mm plywwod is not much harder to work with than stiff cardboard so cutting and fitting the pieces was not hard. I also have a 3.25" holesaw that was just the right size for the hole that compass back sits in. Initally I tacked the pieces together with a hot glue gun. Once I was satisfied with the fitting, I ran a fillet of thickened epoxy up the inside seams. It's a little bit rough righ now but once the epoxy sets I can get to work on making it look a little more "refined".


Looks good so far. I've got a few ideas on what to put behind to ensure watertight integrity but have not made a final decision yet.

As a side note, wooden boats generally have what is called an "end pour". This is where you fill the very tips of the stem and stern with epxoy. This not only adds strength but it also provides a secure place to run your toggles through. Most builders warn about putting too much epoxy in at the one time as it can possibly lead to heat build up during the curing process. Some suggest that you put in small batches at a time to reduce this problem. I've decided to kill two birds with one stone. What I do is simply dump in the epoxy that is left over after various jobs. This way it's put in small amounts and I don't waste any epoxy!  Just another of the many tricks you pick up as you go!!


The last thing to do last night was run a strip of tape up the foredeck seam. By this time it was 12:30 and  time for bed..


Thanks for dropping by!!

Wednesday, February 16, 2011

All decked out - 2nd Step

Tonight was a pretty easy night. I traced and cut out the cockpit opening and created the raised foredeck.

As per the plans, a 2x4 on edge will give the right deck height. Because the centre deck panels were not initially glued, the raised foredeck is easily formed. A sliver of panel is needed to fill in the space.


The image below shows the sliver epoxied in place. It also gives a good indication of the cockpit shape.


In these images you will see the hull off to one side. I've rigged a set of boards to hold either the deck or hull as required, leaving the work table free for whatever piece is currently being worked on!

It's Tuesday night and I could've been at the pool, but creating a boat is actually more addictive than paddling one!!!

Next step is to tape the foredeck seam. While that is setting, I will work on the recesses for the hatches and compass.

Tuesday, February 15, 2011

All Decked Out - the 1st step

The problems I had with my stem have been playing on my mind for a number of days. I was concerned that the changes made would affect how the deck would fit. Last night I lofted the lines for the deck and made the cuts. Much to my suprise and GREAT relief, the alterations I made will have very little bearing on the final fitting of the deck - just some minor trimming in the bow . This was to be expected. Funny,  but I lofted, pencilled in and cut the deck in far less time than it took to do either the side or bottom panels. I was less careful on the marking and cutting but for some reason the lines came out more fair!  Go figure.

With just a little bit of shaving and some tweaking, the hull and deck will made just nicely!  Pheww - dodged that bullet!!!!


As I said in an earlier post, I think I will copy the cockpit shape of my wife's Prijon Seayak. It's a little tighter than my Baffin but I can enter and exit with no issues. I simply took a piece of cardboard and traced the cockpit shape. Easy Peasy!!


In this picture you will see that the foredeck is still flat. The centre deck line is not glued so that it can be raised into a peak. Once I cut the cockpit out, I will raise the two panels and fill the resulting gap with a small piece of plywood and then tape and epoxy. I've left  two plywood "ears" on the cockpit that will be used to hold the thigh braces.

Yesterday my hatches arrived from Boreal Design - a Canadian kayak company -  which is another reason to get working on the deck.  I went with a 10" front hatch, 8" dryhatch  and 11x17 rear hatch.

For those not familiar with BD hatches - they are made in Canada from a high grade rubber. I've paddled them in some pretty cold temps (-15) and they've NEVER gotten  hard. They are always as easy to get off warm as they are frozen. No special tools required either!! That's a definite bonus for cold water paddling.


Shiny AND Stinky!!

Next step - cutting the cockpit and raising the deck!!!

Monday, February 14, 2011

A Pain in the Glass

On Saturday I was ready to do the final bit of glassing on the hull - the inside. I just finished sheathing the outside of the hull on Thursday with 1.5 layers of cloth and 3 coats of epoxy.

Friday night was actually a pretty slow night. A friend showed up with a bottle of Gibson's 12 Yr old whiskey - om nom nom!!. We put a very fine dent in the bottle before 10:30 when he went home. Not wanting to miss an entire night of building, I decided to pull the stations out of the hull and complete the filleting of the keel and chines. A very short job and no pictures either.

Saturday was my son's basketball tournament. This was an all day affair so I was not able to do anything with the boat until after supper. I tackled the next task on the list -  putting one layer of glass and two coats of epoxy on the inside.   The glass and first coat were done in a couple of hours on Saturday night. I put the final coat of epoxy on at noon on Sunday.  As often, I never bother to take the camera out during the process - don't want to get expoy all over it - so I only have a shot of the finished product.


Inside completed. Note the "alternate " location of the boat at this time. (See reason below)


Shiny!!

The next big thing to do with the hull is sanding but I'm holding off on that for a while. I want to get started on the deck. The deck is made of 4 separate panels that are glued together to make a one piece deck. Sunday night's goal was the gluing up of the panels. Again, I used glass butt joins (no scarfs or plywood backing plates). It all went rather smoothly.  I only have a picture of the whole affair as it was after setup. Note that I needed the full table so the boat was relegated off to the wings!

Joining up the deck panels.

I used the weights to hold the joins during the gluing up. Two sets as there are two joins in the deck.  On the edge of the table you can see my batten. I had to reglue it as the original join broke during some rough handling!

Next step is lofting the lines onto the plywood and cutting the deck. I can't wait to see this thing sitting on top of the hull.  Fingers crossed that my hatches arrive today!!