Monday, October 15, 2012

Point Bennett Project - Designing and Building by the Seat of my Pants


With the boat now inside, I can get down to brass tacks, as they say!!  I needed to decide on a cockpit size and shape. One of my main beefs with this boat before was the over sized cockpit. This time I've opted for a true keyhole shape. I scoured the Internet and found two separate templates that, when combined, gave me the exact shape I wanted.  (One of the templates was from Bryan Hansel's Sisiwkit LV and the other was from a kayak built by John Coppens.) After piecing them together I saw that the resulting shape is almost identical to the NDKs. I downloaded the images of the coamings and using Photoshop I scaled them up to 100%.  Then it was just a matter of gluing the template to the 1/2" MDF.


Hybrid template.

The title of this post is "Designing and Building by the Seat of my Pants" by which I mean I have no set plans for this project. I am, for all intents and purposes, making everything up as I go along.  I simply decided upon a general deck shape and starting drawing up forms based on that. Deck height was determined without even trying it to see if it will be OK. The three images below show some up the initial setup to determine the deck shape and such.

Coaming and deck height testing!

Determining the fore deck shape.

Testing how the strips will fit around the coaming template!!

Once I had the forms cut and in place for the fore deck and the cockpit template in place, it was time to start putting on some strips. The stripping went pretty much without incident. Luckily everything lines up nicely and the transition from fore deck to aft deck went smoothly (something that I had a bit trouble with when I built the Black Pearl) I'm guessing that stripping the whole deck took no more than 4 hours in total.

Letting the strips run long. They will be trimmed later.

Fitting the strips around the coaming.
Fore deck completed.

Aft deck waiting in the wings!!

Showing the new curved sheer of the aft section.

Looking aft.
With the stripping finished, I left the deck for a day so that the glue could set up. The next step is trimming the long strips. I used a razor blade knife for the rough cut, followed up with a small block plane. With the deck trimmed, the nice lines of the boat have returned.

Deck trimmed,

Looking fwd.

Looking fwd.

Looking aft.

I must admit that I am quite pleased with the new shape of the boat. The resulting curve from dropping the sheer at midships really adds to the look. The fore deck is a combination of flats and curves on the cross section that will really show up once I start to sand and will be even more evident when painted. And the smaller cockpit is more fitting to the new look as well.

All in all, I'm a happy camper.  Next step is sanding the interior of the deck and then glassing it!

Thanks for dropping by,

Sean

Tuesday, October 9, 2012

Point Bennett Project - Just Like Coming Home


Because I was doing the initial cutting outdoors, I've been limited by the amount of time I could get to work on the project. With the evenings closing in and the more persistent wet weather, time was short!!

I finally managed to finish sanding the sheers today. I wanted to do this outdoors as much as possible as it cuts down on the amount of paint dust in the house - always a good idea. I had a bear of a job getting the Gorilla Tape residue off the hull but the use of an industrial strength citrus cleaner finally did the trick.


Sheers sanded.


With the sanding completed, the boat was ready to go back into the shop, aka, my attic. It went back in with  no problem whatsoever. Now that it's inside, I'm not held hostage to the weather and darkness. Yayyyyy!!

The first thing I wanted to do was make a final check on the evenness of both sheer lines. I strapped the boat down onto foam chocks on the work table. Then using a level and a rasp, I evened and faired everything up nicely. It was a lot easier to do it this way than when it was slopping all over my picnic table outside!!!


Making everything  nice and even!

Satisfied with the sheers, I moved onto actually looking at how I'm going to do the deck. I had an old template from a previous cockpit that I simply laid in place and then ran a strip up the front deck to get the creative juices flowing. This cockpit is too small - it's only 29" long - and I think I'll stretch the final opening to a 31" keyhole shaped. I'm not as limber as I used to be so I need that extra few inches to enable me to get in easier!!  I also need to determine the height of the deck in the front and I am trying to decide between 11"and 12" under the deck.  Deck height at my feet is another crucial measurement I'll have to figure out!!


Just checking things out!!

The foredeck


Looking from aft!!


Now that the PB is "home", I can really start to make some headway on this project.

Thanks for stopping by,

Sean


Sunday, September 30, 2012

Point Bennett Project - The First Cut is the Deepest!!


In my previous posting, I outlined my intent to re-do the deck on my Point Bennett S&G boat. Well, today, I  decided I was going to rip the deck off. I'd been playing around with some profile shapes over the past few weeks but I figured now it was time to actually do something about it. So I spent an hour this afternoon (Sunday) chopping up a boat that I so lovingly built only a year and a half ago!! How things change!!!

A note of caution. Some with weak constitutions (or the inability to comprehend such mutilation of their boats) may find some of the following pictures a bit disturbing!!  I, by the way, have no fear doing major modifications to my boats. I figure that if I put the deck on there in the first place, I can damn well rip it off and replace it with another. 'Nuff said. Let's get the gory details of the surgery!!


Prepped to go under the knife.

For now I am simply removing the deck so I chose to cut right along the sheer line.

The first cut!!

No turning back now!!

Finishing off the first side!!

I need to separate the deck from the internal bulkheads and because I was not re-using the deck, I simply made cuts in the appropriate places to expose the bulkheads for easy cutting with the saw.


The El Camino Kayak!!

The plywood rings holding the hatch coamings were epoxied to the sides of the hull and required some extra cutting to remove them


Fwd hatch coaming holding on!!

A shot of the carnage!!!

With the deck completely removed I was transported back in time to February 25 2011 when I was at this very stage when initially building the boat.

Deck finally off and the hull ready for "height reduction"!!

The next step is to mark and cut the new sheer line. I already have the new sheer marked but I need to do some close scrutiny to make sure it's what I want.  After that, it's back to the attic for the boat and the rebuilding of the new deck, coaming and installation of a skeg.

Thanks for dropping by and my apologies for the disturbing content,

Sean

Friday, September 21, 2012

Fall/Winter Project - The Point Bennett Goes Under the Knife


I vowed not to build another boat for a while, yet there's still that urge to create  In spring of 2011 I built my 
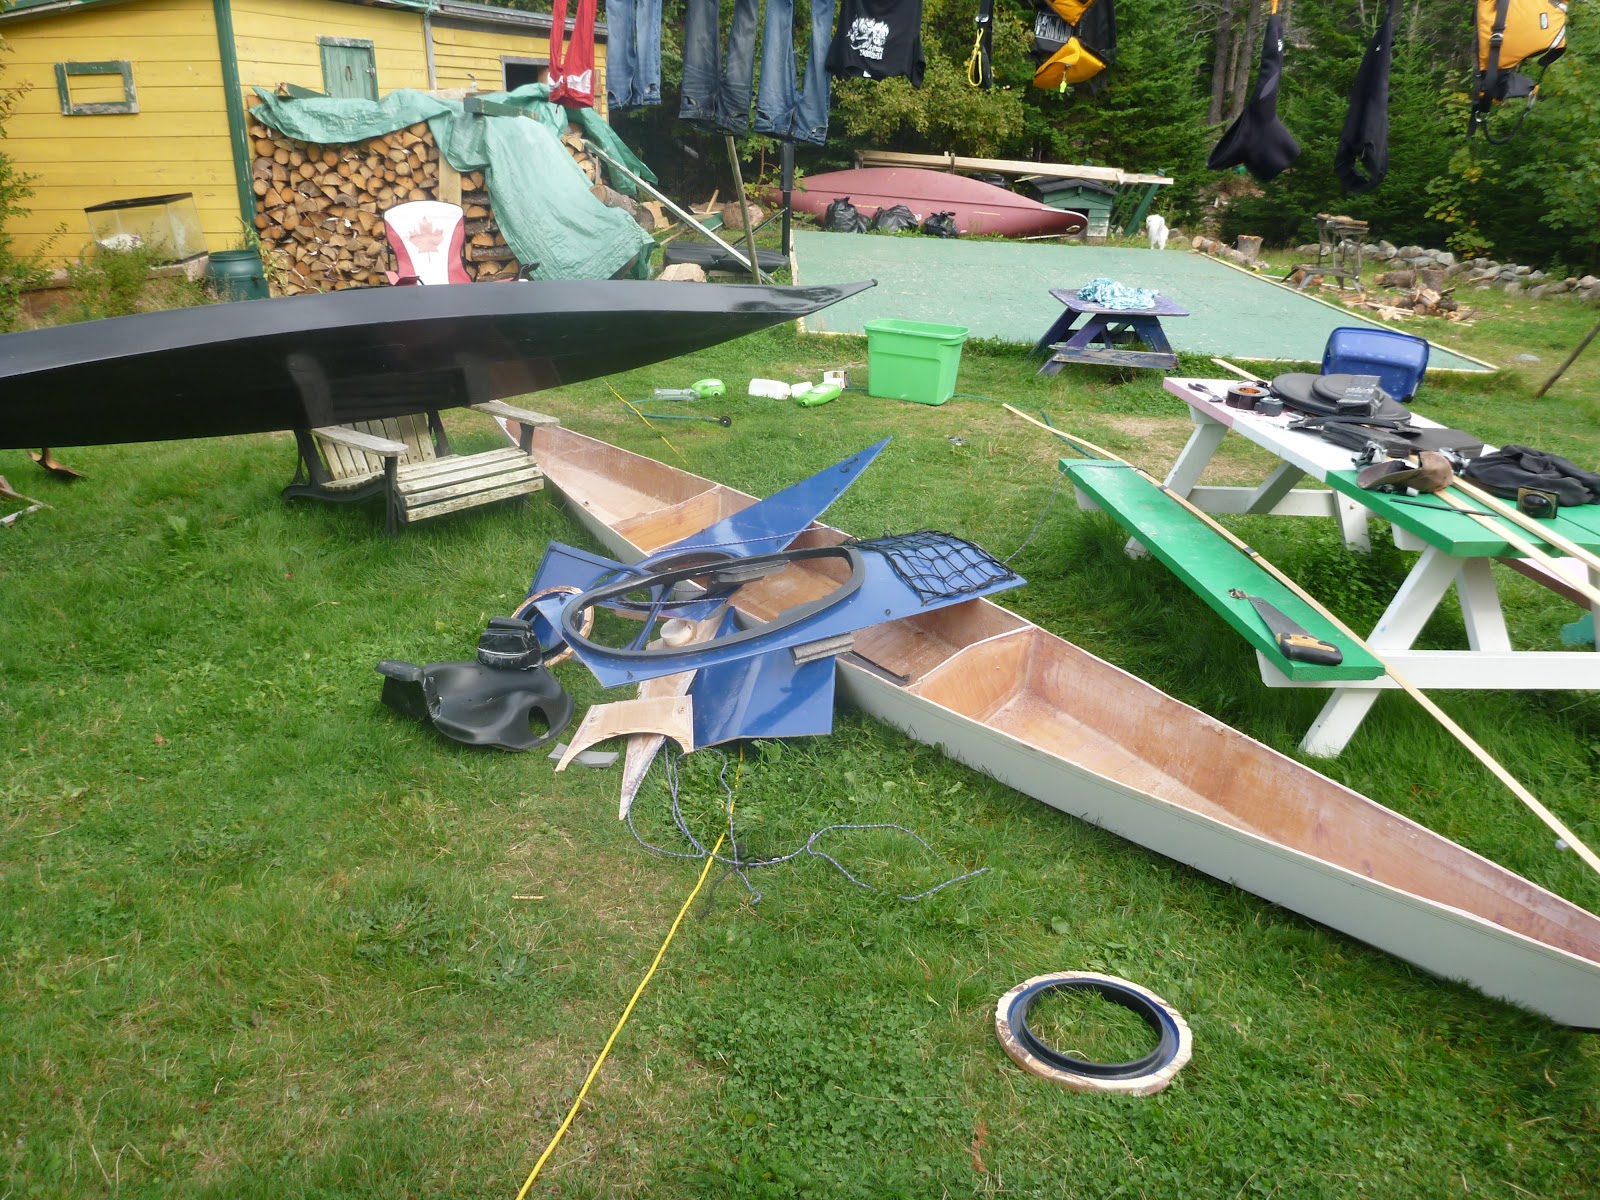
Point Bennett, a plywood stitch and glue boat designed by Duane Strosaker. While I really enjoy paddling the boat, there are few things that I'd like to change - all, with the exception of one, have to do with the deck. So, you guessed it, the deck will be coming off!!

Why, you may ask?  Well, here's why:

The Point Bennett was designed to carry camping gear and such, so, while it is far from high volume, it has more than I need. (I have no desire to camp from my kayak). Once I cut the deck off, I will proceed to drop it. This will not only lower the volume, it will also drop the height of the cockpit coaming in the back. I find the current height a bit hard for layback rolls and such.

When I replace the deck, I will be going with strips rather than plywood. Strips are much easier to come by here than marine plywood. Plus the strips will allow me to build a rounded deck that may help with foot room when I drop the height!!!  Plywood does not lent itself to bending so you are more restricted in what shapes you can make.

I was NEVER happy with the cockpit size and coaming!!  When I originally cut the opening, it made it too big and of course once it was done, I was pretty much committed. I also built the coaming out of stacked plywood rings which, while pretty simply, is big and bulky. After seeing the job I did on my Black Pearl, I will be going the coaming made of laid up fibreglass. I will also make it a keyhole style. And SMALLER!!

In addition to reducing the size of the coaming, I am going to recess it as well. This will lower the height even more. I'm not sure how I'll be doing this yet but I have some ideas!

Like the cockpit, I was also NEVER happy with my padeyes (the deck fittings that hold the lines). They leaked from the get-go and when I finally got them tight, I didn't like the system I used.  When I replace the deck, I will be going with the Maroske, a used on my Black Pearl. They are strong, watertight and very pleasing to the eye.

Hopefully, I will be able to re-use my hatch coamings. I think I can safely cut them out and re install them in the new deck.

I never put a skeg in this boat when I built it but, later, I had occasion to wish I did. Seeing that I'll have the deck off, now is the time to install one. I have a Kajaksport skeg on order from Newfound Woodworks. Although the PB can be paddled without a skeg, sometimes it's nice to have that tracking assistance!!

And what do I expect to get out of this?

I currently have my Black Pearl and Point Bennett side by side and upside down in the backyard. Their hulls below the water time are incredibly similar in shape - albeit the BP has more rocker!!  I am expecting the LV Point Bennett to be fast, nimble and a great roller. It will have a little more volume than the BP, so it'll carry a bit more gear. The skeg will be an added bonus in certain wind conditions.  The new cockpit  will be cleaner and less open.  The padeyes will be lot strong with no fear of breakage. The deck will have more curvature. I may/may not see a reduction in weight - this remains to be seen.

I am guessing that many, upon seeing the "new" Point Bennett will assume that I've built a new boat.

When I first dreamed up this project, I figured it was simply a matter of cutting off the deck and replacing it but when you look at it, the deck is the most time consuming part of the entire build.  I'm rearing to go!!

Thanks for dropping by,

Sean

Sunday, August 26, 2012

The Glacier Walk-Around


In my last posting, I introduced our new boat, the Glacier by EasternIsland Kayaks. I'd like to take this chance to show some of the details of the craft. 

I was a bit apprehensive about buying a tandem as some of them are quite ugly and do not even resemble kayaks. After the designer/builder Craig Greenham sent me recent pictures of one he'd just completed, I was quite amazed that, while still a fairly big boat, the Glacier still has the nice lines and look of a fine kayak. Those pictures that Craig sent, sold us on the idea of buying the Glacier.

Many tandems have very high decks and I was concerned that it would be an issue for Cheryl and I as we both use Greenland paddles. (I find that I hit my fingers off the deck of higher boats when I paddle). I also explained to Craig that we did not intend to use the boat for heavy touring, so greater storage capacity was not a necessity. As a result I asked that Craig drop the deck by 1" -  which he said he could do with no problem.  The result is what can be called a Glacier LV. The coaming height at the front of each cockpit comes in at 13" - which is pretty low for any boat. Lowering the deck height also also makes the boat look a bit more sleek, in my opinion.

This is not a heavy tandem either. Cheryl and I carried it with relative ease from the car to the water and back in St. Philip's today. Getting it back on the rack is not too hard either. Still. this is a 20' boat so it's going to be handful to move around not matter what weight. I'm guessing that it's about 80 lbs. Craig offered to do the boat in carbon/Kevlar for further weight reduction but I did not see the need.

Now, on to the tour  . . . 

Profile shot showing dropped deck.

Looking aft.

Looking fwd.

After taking in the overall shape of the design, the next thing that hits you in the craftsmanship that Craig puts into his boats. The layup is superb and his attention to detail really stands out.

Let's start with the cockpits . . .

The seats mounts are integral to the cockpit coaming. The seat, itself, is bolted to the mount with two screws on each side. These screws allow slight pivoting of the seat. The seats themselves are very comfortable.  Craig used Kajaksport backbands which provide good support and are easily adjustable using large velcro straps. The coaming is very smooth with no sharp edges. The coamings are a pretty standard size, too. Not big and sloppy liked you'd expect in a tandem, Our Seals 1.4 sprayskirts fit perfectly which saved us a chunk of money by not having to buy new ones. The aft bulkheads are angled and the joins are very clean.

Craig left the foam off the thighbraces as he figured we'd like to do the customizing ourselves - which is quite true.  The footbraces in the forward cockpit are by Kajaksport.

The two images below give a good indication of the clean look and feel of the cockpits. Very nicely done.

Fwd cockpit.

Fwd cockpit.

I was giving the rudder a good looking over when Craig told me that he makes all the parts himself. I was quite impressed. This is a well made and solid setup. He even uses 1/8" braided SS cable - which is a substantial size and it's not hard to tell that it's a step above what other commercial boats use. I'll admit that after we ordered the boat, I began to wonder what kind of rudder system Craig would install. I've seen some chintzy systems but no worries about that here. Craig really came through with this boat!!!


Made right here!!!!

Of course, I was also wondering about the style of rudder pedals as well. I was afraid that I'd end up with the   sliding type. Again, Craig came through with flying colours when he installed the Kajaksport "gas pedal" system. In this case, the pedals remain stationary and you simply pivot them with your toes to activate the rudder.  We had a somewhat similar system on our Prijon Seayak but this setup is much more comfortable.


Gas pedal for the rudder!! Take note of the clean FG layup on the hull and bulkhead!

Rubber hatches are not an option on this boat but I'm more than pleased with the ones it has. Each hatch lip is built up just like a small cockpit coaming.  Craig has a sprayskirt company make up the neoprene covers. The hard cover for the hatches is laid up fibreglass with a gel coat finish. The images below show the three steps of hatch closing.

Looks just like a tiny cockpit coaming!

Neoprene cover is nice and tight.

The gloss of the gel coat matches the rest of the deck nicely!!

In all the images above you will notice the clean look of the deck and the fittings. All hatches, coamings and deck fittings are recessed and all have excellent drainage too so that no water stays on the deck. These are signs of a designer who pays attention to detail.

Today (Sunday) Cheryl and I took the boat out for a 2.5 hr paddle. We both noted that the seating was quite comfortable and I must admit that it's nice having the leg room to stretch out. (My Black Pearl is VERY tight and there's no leeway when it comes to "foot space").   We were getting much better at staying in sync as well once I adjusted my stroke rate. I think we will have lots of fun with this boat.

Well, that's a quick look at some of the key features of the boat. I will try to do another posting on paddling impressions after we spend some more time in the saddle, so to speak.

Cheers and thanks for stopping by,

Sean

Saturday, August 25, 2012

Introducing . . . The Glacier


I am just going to post a few images of our latest addition to the fleet. The detailed review will have to wait until we finally get a chance to get the boat on the water!!

Briefly, the Glacier is a glass double built and designed by Craig Greenham of  Eastern Island Kayaks. Craig can design and lay up a boat that will rival and, in many cases, better some of the world's renowned kayak companies.  On July 24th, I gave Craig the green light to build us a new boat. It was ready for pickup on Aug 24th. That's not a bad turn-over for a hand built boat!!!

Cheryl and I drove out to Twillingate to pick up the new boat. We made a chance for some "away-from the-kids" time and spent the night in Gander alone. We drove to Twillingate the next morning to meet Craig. He had the boat prominently displayed on his lawn so that we'd know which house was his. In hindsight, the boat on the lawn in slings would've made an excellent picture - insert face palm here!!!

Our initial impressions of the boat were "wow" and "holy crap, what a beautiful job"!!!

After speaking with Craig for about an hour, settling the score, and strapping it the top of the car, we headed off for Twillingate lighthouse for a look-around.


At Twillingate Lighthouse.

Showing the nice lines!!

Twillingate as the backdrop!!!

When we finally got home and took the boat off the car, we had a chance to look at the craftsmanship. No doubt, I will be doing a full review in the near future. For now, we are just champing at the bit and waiting to get this thing on the water!!!

Cheryl checking out the primary and secondary stability!!

Stay tuned for further updates!!

Thanks for dropping by!!

Sean

Monday, June 18, 2012

The C-Monster's New Paddle

A fellow paddler, I'll just call him The C-Monster, asked if I would make him a Greenland paddle. I really like making paddles but lately have not had any reason to do so. This was my excuse to start a new project.

I'm not going to outline the build as it is pretty much standard . . . 


Still working out of the dining room

Schedule 40 clamps on the loom. Western Red Cedar sandwiched in between Spruce.

All glued up and ready for shaping.

Weight before any shaping - 85oz!

Using a power planer for the initial shaping.


Forming the taper.

Weight after cutting the tapers on the blade - 58 oz.

Add caption

Shaping the blades.

ABS pipe cut to fit.
Once I have the rough shape finished with the power planer, I move onto a small block plane, rasps and sandpaper. Some may frown upon the use of the power planer, but it works wonders - very fast wonders - when you need to remove lots of wood, quickly!!  If you are careful, it does a great job!!  Just don't let your attention lapse or you can easily ruin your work.

I knew that the C-Monster, would be spending time near the rocks, so I offered to put on a plastic tip protector. I have one on my paddle and it does an amazing job of saving the soft wooden tips It also allows you to use a sharper tip on the paddle which makes it a lot quieter in the water.


Showing the inset into the paddle tip.

Plastic being epoxied onto the blade.

Tip after sanding.

Paddle after shaping , sanding and wetting out.


I failed to get a final photo of the paddle before I handed it over to the new owner. I went with the all-black tips - like I have on my paddle.  The paddle is 88", with a 20" loom. The blades are 3 3/8 at the tip. It weighs 31 oz. Like all my paddles, I finished it with Tung Oil.

I hope that the C-Monster gets a lot of good paddling out of this one!!!