Friday, March 16, 2012

Black Pearl Project - I'm tired and I want to go to bed . . .

It's late on Friday night, I've had a few (too many) glasses of wine but I feel compelled to provide an update. Why you ask?? Because the next step is putting the deck on  this boat!!

To summarize, I now have the hull glassed - both inside and out. 

The pictures below show the inside of the hull prior to glassing. I used a scraper to do the "heavy" material removal. After the scraper, I used the ROS (random orbital sander)!


The inner stems were 3/4" western red cedar. Light but that does not mean you need to leave the whole thing in place!! I used a chisel to remove any "unnecessary" wood!

Chiselling out the stem - bow!
I did not take any pictures when I did the fillets of the chine seams. I simply whipped up  a batch of thickened epoxy and filled the seam. Rather uneventful!  UNTIL I decided to glass the inside of the hull!! It was 9:00 PM at this time and taking on such a task meant a few more hours of work before I could rest for the night!! I decided to go for it!

At 11:00 PM  I was finished!!!  A great thing to have out of the way but damn was I tired!!

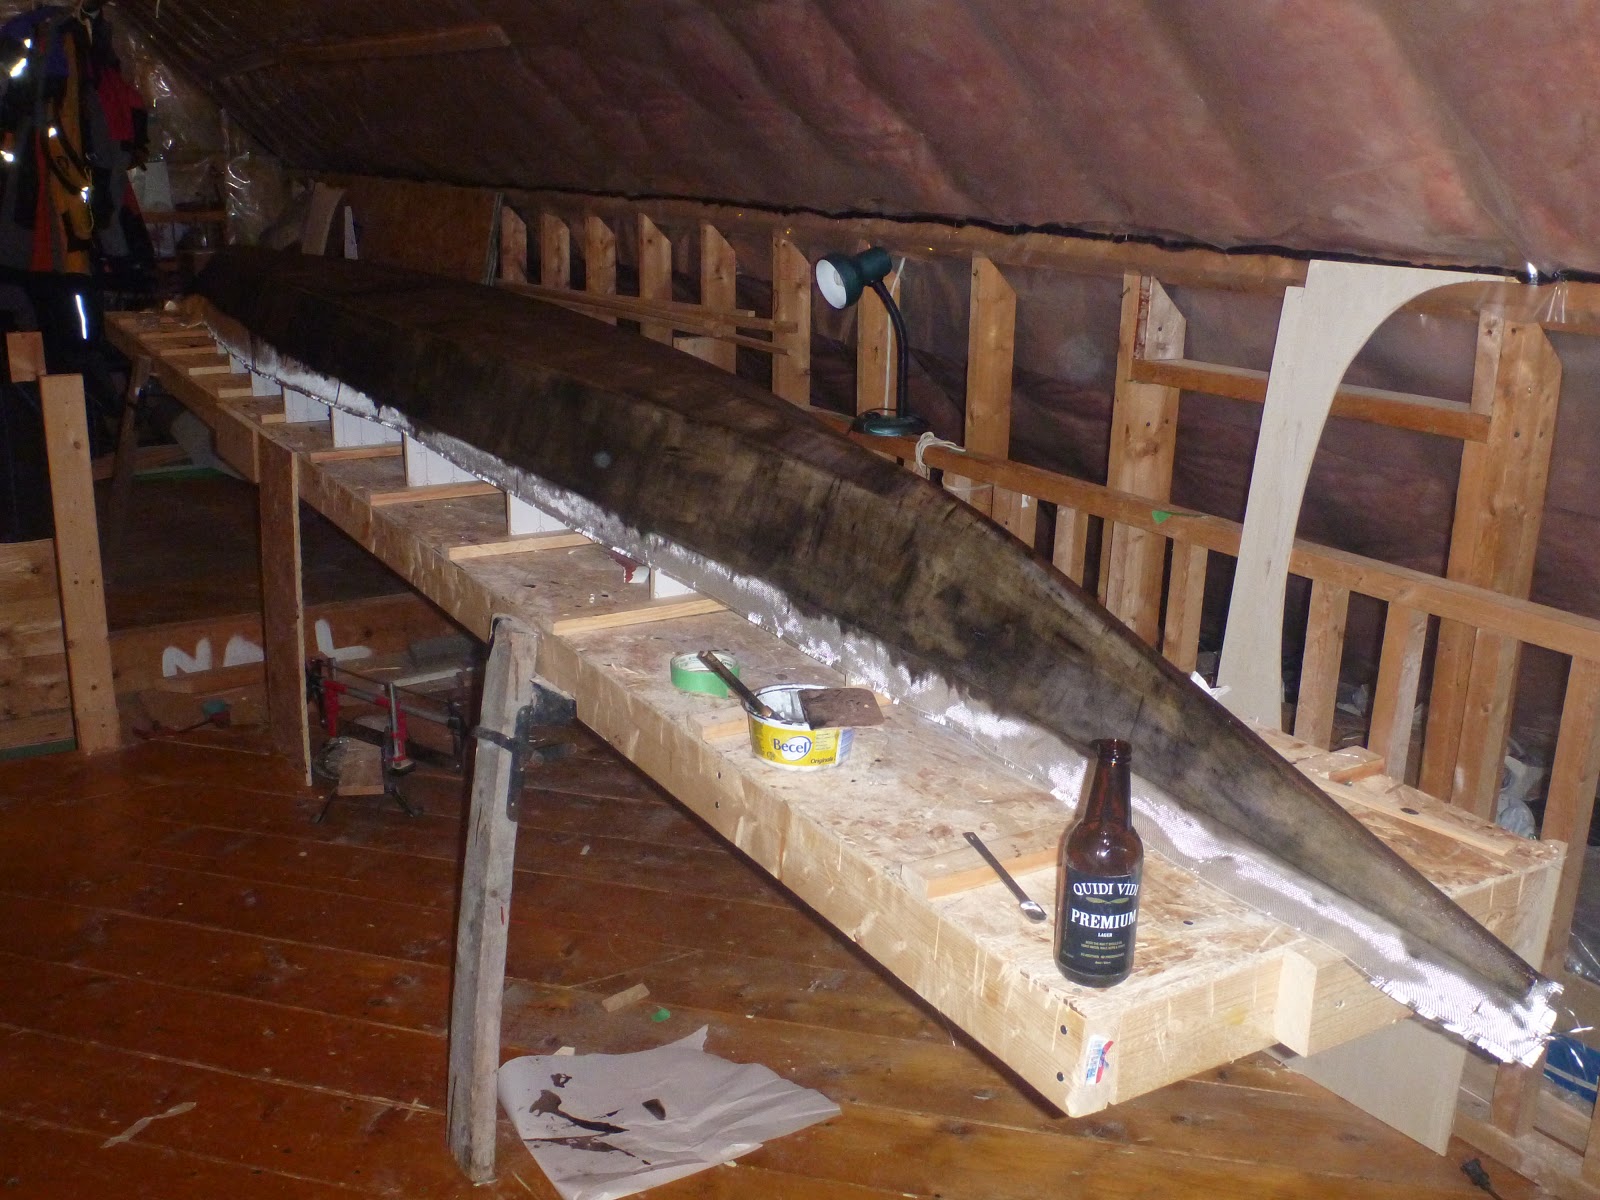
Still this was setting me up for an "easy" Friday night" - trim the molds to conform to the shape of the deck, cut out the cockpit template, and then glue the sheer clamp in place

Molds trimmed to shape! - from the bow

Sheer clamps are simply pine strips epoxied in place. Clothes pins came in handy!!

Sheer clamps in place - stern. Clothes pins were invaluable!!
 I cut out the cockpit template as well. In this pictures you can see it  in place.


With the sheer clamps in place, the next step is actually planking the deck. Sounds good to me!!

Sean

Sunday, March 11, 2012

Black Pearl Project - When You're Out Of The Wood and Into The Black


It's been almost a week since I've posted an update, and, yes, a bit of progress has been made in the interim. So here goes . . .

The last photo in my latest entry was that of a new electric ROS - random orbital sander. The ROS worked great for taking down the strips to the one level but I didn't want to use it for final fairing of the flat hull. Using a sanding block was certainly an option but I grew to like the idea of the shop vac sucking up all errant dust. The obvious solution was to devise a sanding block that could be attached to the shop vac. No biggie, I figured. An hour later it was done. I simply made a hollow block out of some scrap plywood and a few short pieces of pine strips. Luckily I had an old vac head lying about so I trimmed it to fit on top of the block. 

Works like a charm!!


Vaccum assisted sanding block!

Not pretty but it sure works!!

There comes a time in every boat building project where you just have to say "Shag it, that's enough sanding"!! I reached mine on Thursday. After fretting and sweating over the hull for several days I decided that it was good enough. Besides any small imperfections would be hidden under 6oz glass a several coats of epoxy, right?

On Thursday night I ran a thin coat of epoxy to seal the bare wood in preparation for the glass. The pump on my can of epoxy resin was acting up but I managed to get a good enough mixture and it set properly!!

Below are the only two pictures of the bare hull with the clear epoxy. Many people strive for this wooden look but it does nothing for me. Believe it or not but I'm the only person to actually see the hull in this state. These pictures and my memories are all that remain of this moment in time!! Deep, what??

Sealing coat of epoxy.

Bow.

With the bare wood sealed, the next step is glassing the hull. As with my stitch and glue, I'm going with 6oz glass. It's pretty heavy but better heavy and durable than light and less durable, I say.


Draped in the glass shroud.

I've decided that I wanted to pigment my epoxy so that any scratches on a black hull would less noticeable. A few years ago I managed to find some epoxy pigment at a local store but when I inquired about it a few days ago, of course, they no longer carry it. I did a lot of searching on the Internet for "safe" ways of colouring epoxy. I happened upon a page at the West Systems website that gave me some great ideas.  One was the use of tempera paint powder. Not only is it a safe pigment but it actually increases the adhesion of the epoxy. A trip to Michael's Craft's yielded a bottle (enough to do the whole boat many times over) for just $9.00. Yes!!!  West does sell graphite that would not only colour the epoxy but also make it more durable but that stuff is very expensive and the hardness would increase the difficulty in sanding as well. I'll stick with the $9.00 bottle of tempera paint powder!!


A great find!!

As mentioned, my resin pump was acting up. I thought it was dead and would mean no work on Friday night. But I took the damn thing apart and cleaned it with acetone. Badda boom. Badda bing. It's now working like a charm and crisis averted!!

I mixed the first batch of pigmented epoxy a little weak - but on purpose. I did not want to thicken the first coat of epoxy as this was the "wetting out" stage and I wanted to make sure that nothing went wrong - like the epoxy being too thick to properly soak the cloth. Of the course the result was a grey colour - almost seal skin-like!!

The Mottled Grey Pearl!

After wetting out the first coat, it was time to add the second layer of glass to the the hull below the chines - often referred to as the football - for extra abrasion resistance.  As with my stitch and glue, I ran tape along the chine. When the glass was being wetted out, the tape prevents the extra glass from being glued to the glass above the chine. When the epoxy is partially set, I cut the second layer of glass with a sharp blade right at the edge of the tape. This leaves a very neat and tidy join that can be feathered afterwards.


Glassing up the football!!

With both layers in place, there's nothing left to do but fill the weave of the glass with epoxy. With the first coats out of the way, I increased the amount of tempera powder in the mixture to help blacken the hull more.

Right now I have three thin coats on and the weave has just disappeared. In the image below you will see a rather rough-looking surface. This is from the very small bubbles created by the roller. I tried to tip them out with a foam brush but it was not worth the hassle. They'll just rub out with sand paper later on.


From the bow. Three thin coats of epoxy

From the stern.

Port quarter.

How the third coat looks after drying will determine my next course of action - either one more coat or, if it looks fine, take the boat off the molds and begin thinking about doing the inside of the hull!! 


Out of the blue and into the black
You pay for this and they give you that
Once you're gone, you can't come back
When you're out of the blue
And into the black


Monday, March 5, 2012

Black Pearl Project - One hulluva nice looking boat!

Between this and my last posting, I managed to finish planking the hull.  Once I got onto the straight runs on the bottom of the hull, things moved along very quickly. As I am not varnishing this boat, I do not need to worry about how the strips look, i.e., there's no pattern or inlays or what have you to slow me down. As you can see in the image below, I simply let the strips run off the edge of the boat. These were easily trimmed afterwards. Not having to fit and cut each strip, beforehand, made for an easy job.


Strips running off the edge.

Once I had the hull planked, I moved onto the sanding. In the images below you will see the rough sanded hull - 60 grit. The first step is to fair the hull and to bring all the strips down to the same level, so to speak. This took a couple of hours. You will also see some fairing compound - either gray or pink. I used this to level up some spots on the hull. Again, as I am painting the boat, these will be not be seen in the finished product.

To neaten up the stems, I used a piece of 1/4" thick oak. These are glued into place. Notice the use of packing tape to hold the strips in place while the glue dried. I had my doubts that it would have sufficient clamping power, but it worked out great in the end.

The bow.

Looking aft and showing the sanded/faired hull.

Rough strip on the stern.

Looking fwd - faired and sanded hull.

Rough strip on bow.

Once the strips were glued into place, it was simply a matter of planing and sanding  them to blend into the hull and to provide a rounded shape to the stems. Certainly looks a lot neater than the ragged ends of the strips.

Finished bow strip with fairing compound.

When I built my stitch and glue boat last winter, I resolved not to use a power sander because of the amount of dust it would kick up. Instead, I hand sanded the whole thing. Of course, even hand sanding  throws up a lot of nasty dust that gets onto and into everything.  This time I decided to go with something different. I read that a ROS (random orbital sander) is one of the best tools for fairing and sanding te hull/deck. I found one at Home Depot on sale for 29.99.  It got rave reviews from a large number of users so I figured I'd give it a spin (pun intended). I hooked it up to my shop vac and, lo and behold, not a bit of dust in the air at all - even after sanding the entire hull!! The few times I had to hand sand, I noticed that the air became choked with dust. I was amazed and happy, to say the least. Of course, it gets pretty loud with the two (sander and vac) running at the same time, but I'll take the noise over the drudgery of hand sanding any time!!


My new favourite tool!!

With the hull rough sanded, I'm now in the process of filling any gaps, doing the final fairing and then the finish sanding. After that, it's time for the glass.

Thanks for dropping by,

Sean

Monday, February 27, 2012

Black Pearl Project - Strip Planking the Hull

Well, it's been a full week since the last update on the Black Pearl Project (BPP) and I've managed to make some headway on the hull.

In my last upate I had just finished setting up the forms. The next thing to do was  cut and fit the internal stems. I went with Western Red Cedar becuase it's easy to work with and it's light. The latter being the most important as these stems may very well be staying in the boat when it's completed. The stems are not for strength but rather are used to help forms/shape the stems. It would be quite hard to get the correct shape without them. There is no pattern provided for the stems, so you are on your own. I went with a simple straight shape. This seems to be the "norm" for this design.


Internal stem - bow.
After fitting the stems, I moved onto the chine and sheers. With the execption of one small flat spot on the chine (which I fixed with a small shim of cardboard) everything faired out quiite nicely.


Stern showing internal stem, chine and sheer.

Looking aft - showing chine and sheer.

Port side - showing chine and sheer.

This meant that planking the hull was next on the list. There's a raging debate on about how one should join strips if you can't find full length boards. (To be honest, I 'm not even sure where one could find 19 foot boards that are clear of knots and other defects - certainly not around here, that's for sure!!)  Some people advocate, vehemently, the need to make strong scarphed joins in the strips. While others say that a simple butt join is sufficient.  The former is a more complicated process while the latter is quick and easy. I bandied the idea around in my head for a while and decided to go with a very simple scarph. At Princess Auto, I found a set of shears that will cut small wood stock. It cost be less than 7.00 (regular 15.00) but cuts like a charm, giving a very clean and accurate 45 degree angle. One snip and you've got a great cut!!

Shears cutting a 45 degree.

To support the join during the build, I've decided to put a backing plate on using a glue gun. Once I'm finished the planking, I can pry the backing plate off because the glue I'm using does not make a permanent bond.

Backing plates on joins (interior)
The 45 does not give a long scarph joint but I'm not that concerned. If you look at how the joins are in a stripped boat you will see that the join is greatly strenghtened by the strips both above and below. In order for the join to fail, both of these strips must break as well. It was a no-brainer, for me, then to go with the quick and easy joins!!


Join (exterior)

After the decision was made on what kind of join to use, it was off to the races. I started the sides on Friday night and spent an hour or so getting down the process.. Saturday AM and afternoon were spendt puttting up more moldings in ther house but by late afternnon I was back at the boat. Just after supper, I put in the final strips on the hull sides. Not too bad for a few hours work, I'd say!!

Looking aft - sides completed.

Port Bow.

Port Quarter #2
With the sides completed, I moved to the two strips that run either side of the centreline (keel). These took a lot more time/fooling around than I be aniticipated. I knew that fitting the strips at the bow and stern was going to a bit tricky but I didn't think they'd be that much of a pain in the rump. I'm thinking a lot of it was my fault in that I didn't think it through enough and just tried a number of different approaches before I came up with one that worked. Nonetheless, with a bit of shaping, cutting and swearing, I managed to finesse the strips into a reasonable fit. Sailing will be a little more smooth now that I've turned these corners - pun intended!!

Port bow - with planking started on the bottom.!

The pointy end - stem.

The other pointy end - stern

I'm looking forward to fitting the final strip on the hull so that I pull the staples and get a good idea of how it all looks. Then I can start shaping the stems and begin sanding the hull . Then the true shape of the boat will become clearer!!

Thanks for dropping by,

Sean

Sunday, February 19, 2012

Black Pearl Project - Strips and Forms

This was a good productive weekend for me - finally!!. Friday night was a bit slow - I made a few test cuts with the strips. I decided to go with the circular saw rather than using my radial arm saw or other stationary equipment. Preliminary testing was positive, so I decided to wait until Saturday so that I could move the operation outside - it was proving to be a VERY dusty endeavor!

Saturday AM was time for a short paddle from St. Philip's to Portugal Cove with Tobias and Dean. It was nice to get back on the water for a few hours!

Saturday afternoon was clear and relatively warm so I decided to give the strip cutting a whir! I set up a plank on the picnic table and proceeded to cut strips from the three pieces of 1x8x8 clear pine I picked up on Friday. It went so well that I decided to run out and pick up 2 pieces of 1x10x12. I started cutting at 1:20 and by 4:30 I had all the strips cuts. Of course included in this time was the trip to the lumber store. Not a bad patch of work if you ask me. I ripped about 66 strips at 8' and 56 at 12'.  Of all these, only one snapped because there was one small knot in the board.  Not too shabby if you ask me!


Making hay (dust) while the sun shone!!

Circular with long fence!

Oh, how many times I walked this walk that day!!

The end product.

Saturday night was spent relaxing and socializing over a few brews. Sunday, I promised Cheryl that we'd put up some moldings. So, after 13 years, we finally finished the cove moldings in the upstairs hall. It was mid-afternoon when we finished so I decided to go back at the boat. I finished leveling up the table. For the centre line I went with a copper wire stretched between two screws. I managed to tighten the wire by twisting the screw. It sounded like a big guitar when I cranked it up!!


Centre line cranked up nice and tight!

I made recesses in the bottom of each station so that it could fit over the wire. I used my Schedule 40 clamps to hold the forms while I did some cursory checks. As expected, the clamps worked like a charm!!


Schedule 40s to the rescue!

Checking the level-ness using the designed waterline as a reference.

Checking the vertical!

Checking for fairness - and sticking on a few strips just to see what it will look like.

With the forms in place, I just need to cut and fit the inner stems. I am not anticipating this to be a big job so I'm not that far off from the actually planking

Friday, February 17, 2012

Black Pearl Project - Forms and Such

The plans arrived for the Black Pearl last Thursday (February 9). It's funny but Cheryl phoned me at work to tell me they arrived and then, jokingly said , "I guess I won't see you for the next six months?!! I promised both myself and Cheryl that I'd not devote the same fanaticism to this build as I did to the Point Bennett this time last year. And  true to my word, I am proceeding with a more relaxed pace this time. Hence the lack of progress reports!!

Here's the first . . .

Plans for the Black Pearl are, what I would call, spartan. But then again, all the designer needs to provide is the actual information to build the hull shape. The rest is up to the builder. Besides, there's a plethora of materials out there on how to build strip boats, so why bother the redundancy of including it with a boat design plan??

The package (envelope) contained a scaled plan view, full size half-patterns, a sheet of instructions and an invoice.

Plan view on top, 1/2 form patterns below.

As I mentioned in a previous post, the beauty of this boat is that Björn Thomasson will design it to fit you personally. In other words, there's no guesswork about whether the boat will be too big/small, not handle properly etc etc. I must admit, I'm glad I payed the extra dollars for this.  For those interested, I had to provide my height, weight, arm span, hip width and shoe size. Thomasson will build to your request as well. My boat will come in at around 18.5" but I know of one instance where Thomasson, at the request of the builder, stretched the boat to 19' 7" for more storage capacity. The plans came to a total of 145 Euros or 190.00 dollars delivered. In the big scheme of things, that's not a whole lot of coinage!!


Here's what you pay the big bucks for - to see that the plans are customized just for you!!

Rather than cut up the plans, I scanned them, then flipped the image digitally, printed both sides (normal and reversed) and taped them together up the centre line. This created a full-size set of patterns from the halfs that were provided.

I decided to go with 1/2 MDF for the actual forms. It has been suggested to use plywood or particle board but I really like how stable MDF is. With a sharp handsaw, you can cut incredibly straight lines as there's no "deviation" in the materials - unlike the voids/splinters in plywood or particle board.

Using a spray adhesive, I glued the patterns right onto the MDF. As there are no curves to be cut at this point (remember this is a chined boat), a sharp handsaw was ideal for cutting out the forms. I'm guessing that it took less than 1.5 hrs to cut and sand them


Forward form patterns glues and ready to cut. 

Aft forms on the left, fwd on the right.

Thomasson's form set-up procedure is very fifferent than that of, say Nick Schade. In the case of the BP, the baseline (see the "tops" of the forms above) is left square and this is fastened to the strongback (or building table, in my case) This will become clearer in the next update I provide but I just wanted to point out that the forms, at this point, do not accurately represent the shape of the deck. The hull, yes, but not the deck. If you look closely at the image above you can see the shape of the sheer and deck. The forms will be trimmed once the hull is finished and the boat flipped over for decking. 

Confused?  If so, stay tuned for the continuing saga of the Black Pearl . . .