Friday, December 31, 2010
Monday, December 6, 2010
The Newfoundland Paddle - a cursory review!
(Apologies for a picture-less blog entry)
It's been just over a week now since I finished the new paddle. Actually, since my last post I made some changes to the paddle. Before I proceed I should give a bit of background. My father-in-law, while not an overly critical man, is not shy in pointing out flaws or imperfections in things - even if those things are still "works in progress". It appears he has passed this "quality" along to his daughter, my wife!! When I presented my paddle to Cheryl for her "adoration", the first thing she said was " this side was thicker than the other" After admonishing her for being too much like her father, I took out a set of calipers and I'll be damned but she was right!!! Of course, I'm a bit anal about things like this (what a pair we are, what?) so I decided that the paddle needed some "work". In this case "work" meant taking it out to the back step at 12:30 in the AM, after having a few beer and "attacking" it with a wood rasp and sandpaper. Of course, this was not before I marked off all new lines. Thank gawd that golden horseshoe is still in place, because I managed to create an even better paddle!! It's better balanced, the edges are sharper and the overall form is much tighter!!
While I took the "old" paddle to the pool on Tuesday, I managed to take the "new and improved" one out for a scoot on Saturday. I'll have to admit, it's a very nice paddle. You can certainly feel the extra bite of the wider blade (3.75 compared to my normal 3.5) but it's not enough to be uncomfortable. I made the edges and the tips my standard radius, i.e., pretty sharp and this makes the paddle very quiet upon entry in the water. Once I got the right angle down, there was no noise upon entry in the water and no raspy sound of water bubbles (cavitation) about the blade during the stroke. VERY sweet!!
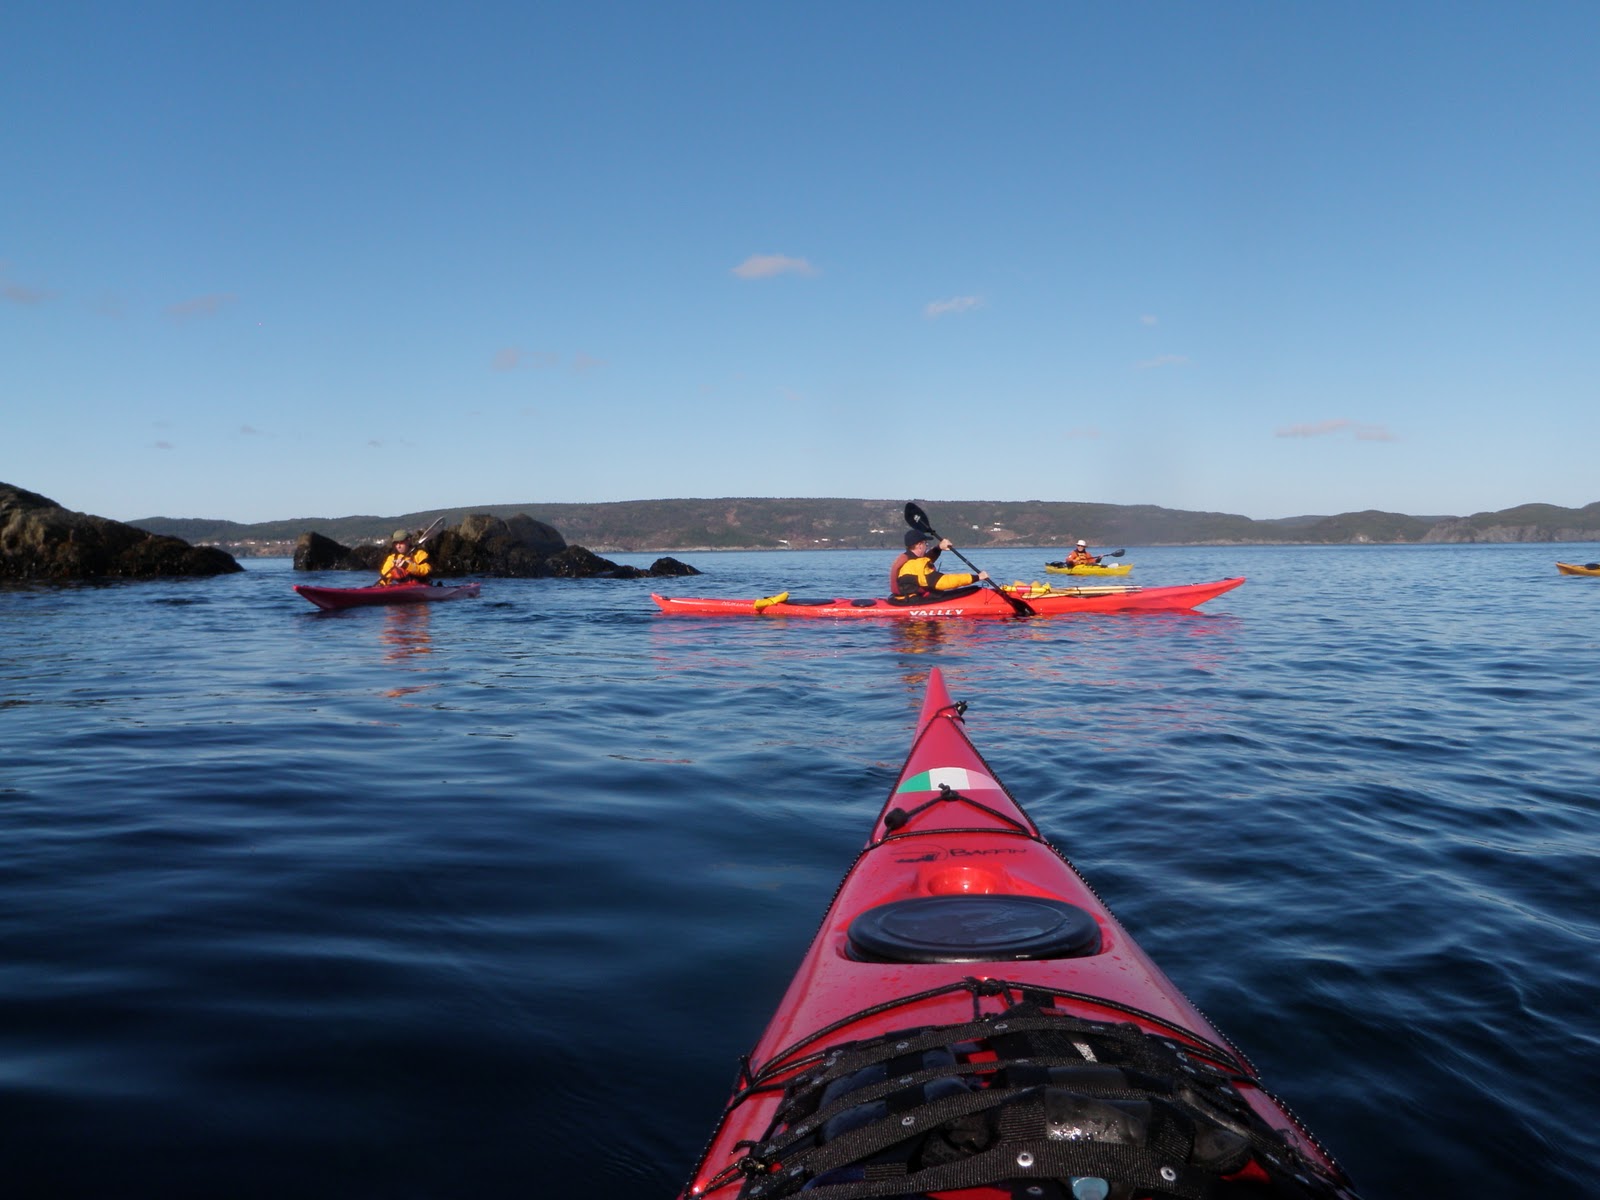
I did manage to get myself into a few spots where the plastic tips came in handy. (The linked image is on the blog of a fellow paddler, Stan Mackenzie. Check out Stan's Kayaking Dreamin' when you get the chance.) I pushed off pretty hard on the rocks a few times and instead of the wooden "thud" of cedar on rock, I got the more reassuring "tink" of hard plastic against rock!! My paddle sustained no injury whatsoever. I did, however, put a few small gouges in my hull!
As we were finishing our paddle on Saturday, I managed to hit "the zone". You know, where you turn your brain off and let your body take over. I found the paddle ultra quiet and ultra smooth. It felt like a hot knife in butter. Every stroke was powerful, smooth, noiseless - a sheer joy.
Boys, I think we got a winner!!
It's been just over a week now since I finished the new paddle. Actually, since my last post I made some changes to the paddle. Before I proceed I should give a bit of background. My father-in-law, while not an overly critical man, is not shy in pointing out flaws or imperfections in things - even if those things are still "works in progress". It appears he has passed this "quality" along to his daughter, my wife!! When I presented my paddle to Cheryl for her "adoration", the first thing she said was " this side was thicker than the other" After admonishing her for being too much like her father, I took out a set of calipers and I'll be damned but she was right!!! Of course, I'm a bit anal about things like this (what a pair we are, what?) so I decided that the paddle needed some "work". In this case "work" meant taking it out to the back step at 12:30 in the AM, after having a few beer and "attacking" it with a wood rasp and sandpaper. Of course, this was not before I marked off all new lines. Thank gawd that golden horseshoe is still in place, because I managed to create an even better paddle!! It's better balanced, the edges are sharper and the overall form is much tighter!!
While I took the "old" paddle to the pool on Tuesday, I managed to take the "new and improved" one out for a scoot on Saturday. I'll have to admit, it's a very nice paddle. You can certainly feel the extra bite of the wider blade (3.75 compared to my normal 3.5) but it's not enough to be uncomfortable. I made the edges and the tips my standard radius, i.e., pretty sharp and this makes the paddle very quiet upon entry in the water. Once I got the right angle down, there was no noise upon entry in the water and no raspy sound of water bubbles (cavitation) about the blade during the stroke. VERY sweet!!
I did manage to get myself into a few spots where the plastic tips came in handy. (The linked image is on the blog of a fellow paddler, Stan Mackenzie. Check out Stan's Kayaking Dreamin' when you get the chance.) I pushed off pretty hard on the rocks a few times and instead of the wooden "thud" of cedar on rock, I got the more reassuring "tink" of hard plastic against rock!! My paddle sustained no injury whatsoever. I did, however, put a few small gouges in my hull!
As we were finishing our paddle on Saturday, I managed to hit "the zone". You know, where you turn your brain off and let your body take over. I found the paddle ultra quiet and ultra smooth. It felt like a hot knife in butter. Every stroke was powerful, smooth, noiseless - a sheer joy.
Boys, I think we got a winner!!
Friday, November 26, 2010
Paddle Project "X" - the Newfoundland Paddle
| Stylistic rendition of paddle only!! |
It's been about six months since I last made a Greenland paddle. I figured enough time has passed.
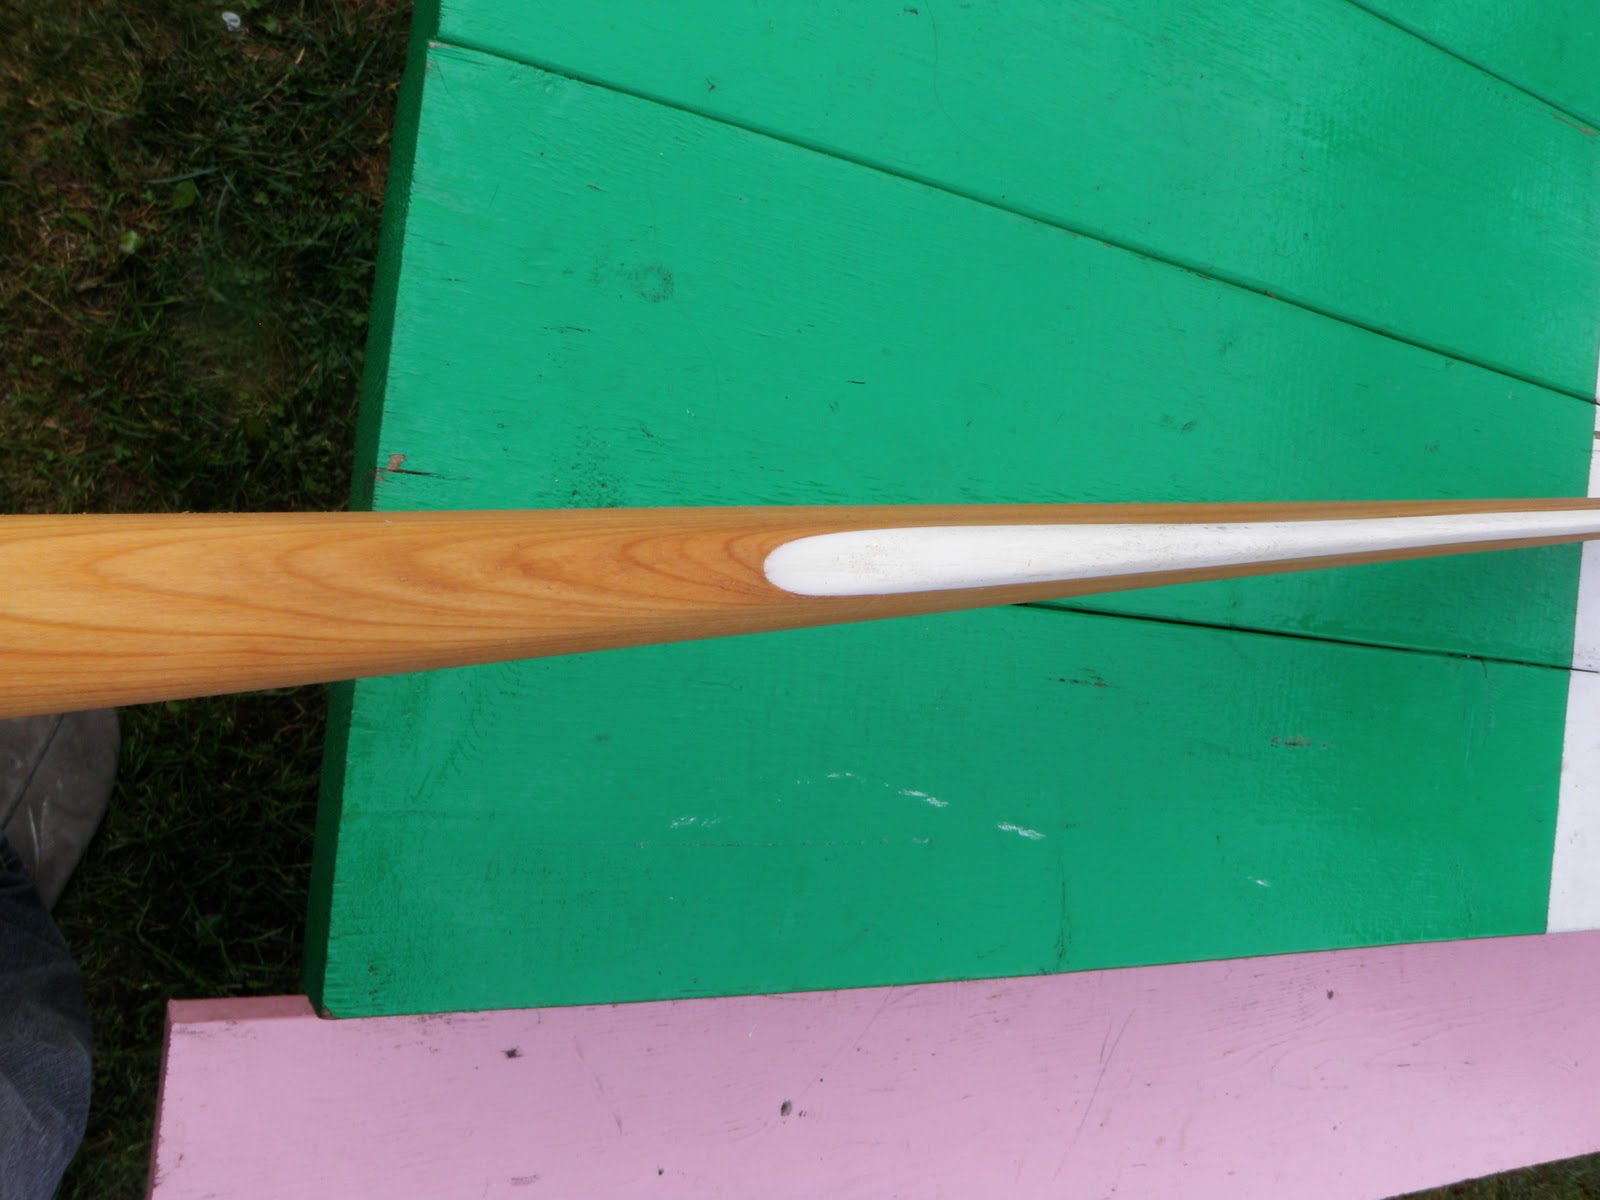
This time I wanted to do something a little different. My current paddle has a small plastic, protective tip that has been working wonders. Some time ago I began toying with the idea of adding a plastic edge pretty much all the way around the paddle blade. The problem was that I was having a hard time finding a suitable material - something that was long enough, thin enough and flexible enough (with the aid of heat) to bend around the radius of the paddle tip. A few weeks back I found this very material - in the decking section of Home Depot, right next to the cedar I used to make the paddle. The plastic is white and is used for capping off lattice - go figure!!
After performing some tests with the plastic, I knew the project was "do-able".
As for the wood, one day I dropped by Home Depot to have a look at what cedar they had in stock. I came across this one peice that was, at one point, on the outside of the bundle. It had the telltale signs - dents from the metal strapping and the discolouration of the wood due to exposure to the sun and air. Of course it was also very dry. It had a split but not anywhere near where I needed to cut. It only had one little tiny knot. There was a slight bow but nothing that couldn't be worked around. To make a long story short, I got a great price on this "damaged" piece and only paid 8.00 for it. Did I mention that it had the perfect grain for making a solid paddle?? The best I've seen yet!!! I couldn't take it home with me right away because I had the small car. I tucked it away under a pile of other cedar with the intention of coming back later that evening. I almost didn't but I'm glad I did!!
So the parts are coming into place.
Why the name Newfoundland paddle, you ask? I liked the idea of taking a GP and somehow tweaking it for a particular purpse. This paddle has the added protection of Home Depot plastic lattice edging so that I can paddle amongst the rocks with less concern of damaging the blades. This paddle will also be better suited for rockhopping due to the increase in blade width (3.75 compared to my standard paddles of 3.5). The extra width will give more purchase on the water in tight situtations! While it is a GP-inspired design, I like the idea of creating our own unqiue padle and so I simply called it the Newfoundland paddle. I doubt that I will be sued for copyright infringment!!!
Now that I have you hooked, stay tuned for the building process and photos . . . .
As mentioned, the major obstacle I had with this project was finding the right plastic materials. I'd been looking for months with no luck. Finally, I found the Holy Grail. An $8.00 piece of lattice capping at Home Depot. I just had to rip it. Which was quite easy with a small hand saw.
The capping is solid plastic but bends easy when heated with hot water. Our domestic water is set at 160 degrees (ouch) to service our in floor heating so it was amply hot to bend the plastic. I'd simply hold the plastic under the stream while bending.
Next, I did some testing on a mock up tip to see what radius the plastic could handle.
The first attempts were successful with regards to the bending but not so with regards to the epoxy. The plastic was too slippery for the epoxy to get a good drip. Damn!! I did some research and found that I needed to prepare the plastic. I ended up sanding it with a rough paper, heating it with a torch and finally cleaning it with alcohol. These steps made a tremendous difference.
The next steps were your standard GP making process. Nothing to see here folks. Move along!!
The tips on this paddle are more "rounder" than my standard paddles due to the need to have the plastic bend smoothly with no gaps between it and the wood. I also had to pay very close attention to the shape as the plastic had to fit snugly. That's not to say I don't normally pay close attention to symmetry in my tips, it was just more crucial in this case.
As mentioned, the major obstacle I had with this project was finding the right plastic materials. I'd been looking for months with no luck. Finally, I found the Holy Grail. An $8.00 piece of lattice capping at Home Depot. I just had to rip it. Which was quite easy with a small hand saw.
 |
| Lattice Capping! |
The capping is solid plastic but bends easy when heated with hot water. Our domestic water is set at 160 degrees (ouch) to service our in floor heating so it was amply hot to bend the plastic. I'd simply hold the plastic under the stream while bending.
 |
| Bending the plastic |
Next, I did some testing on a mock up tip to see what radius the plastic could handle.
 |
| Testing |
 |
| Heating the plastic with a small butane torch |
The next steps were your standard GP making process. Nothing to see here folks. Move along!!
The tips on this paddle are more "rounder" than my standard paddles due to the need to have the plastic bend smoothly with no gaps between it and the wood. I also had to pay very close attention to the shape as the plastic had to fit snugly. That's not to say I don't normally pay close attention to symmetry in my tips, it was just more crucial in this case.
 |
| Shaping the tips. |
Now to test the fit of the "real" plastic on the "real" paddle. All was going according to plan!!
 |
| Testing the fit. Nice! |
I had to make up a gluing jig to hold the plastic in place. A few clamps, a piece of wood, a few nails and a piece of string and we're off to the races. I placed the nails close to the edge of the plastic then "laced" them up with string to pull them tighter. Worked like a charm. Note: Make sure you put plastic wrap UNDER the paddle or it will glue permanently to the jig!!.
 |
| Doing a little jig!!! |
 |
| Marking out! |
 |
| Shot in the rough! |
With the plastic attached, I was ready to do the second stages of marking out, i.e., the final shaping of the paddle faces and edges. I'll admit that the marking out stage is the only stage of paddle making that I DON'T enjoy. This paddle required some adaptation to the marking out process. Pencils do not mark on plastic so some of my lines had to be made with a Sharpie. Other than, it was par for the course!
 |
| Calculating - did the Inuit have to use a calculator? |
Final shaping of the paddle was pretty standard - even with the plastic edges. The plastic actually planed better than the wood. No images of the final shaping!
I was hoping to get out for a paddle so that I could give it a good soaking before doing the final sanding but it was not too be. So I wetted out the paddle with the hose. The images below show the paddle wet with water but not with tung oil - which is what I always use to finish my paddles.
 |
| After wetting out! |
 |
| Blade detail |
 |
| Tip detail |
 |
| In its natural element - the rocks |
 |
| Much neater than the image above (Shot in the rough), what? |

All in all, I'm very pleased with this paddle - even though I've yet to try it!! The proof will be in the pudding, as they say!
Particulars:
Length: 88"
Blade Max width: 3.75"
Loom: 22"
Loom Diameter: 1.5 x 1.125
Shoulders: Very soft
Weight: 31 oz
Sunday, November 14, 2010
Kayaking - it's a game of inches!!
For those of you who may have been following my blog for some time, you will remember an entry I made about a pump holder constructed from a suction cup and a piece of PVC pipe. This holder worked famously when I positioned my pump up underneath my foredeck. When I made my under deck hydration system, it took up the space of the pump. I initially thought the two could fit under my deck but my size 13 pontoons would not allow this!!
I ended up moving the pump to the floor of my boat just fwd of my seat. I'd leave the pump on deck until launched and then I place the pump in its holder. Once in place I did not even know it was there UNTIL I did a wet exit once and hooked it with my feet on the way out!! I am not sure if this would happen every time or if this was just a fluke but I decided that I needed to work on the pump's position.
 |
| The initial setup. |
I noticed that the front of my seat is raised a fair bit (which I might add, contributes greatly to leg comfort) and hollow, to boot. I figured I could drill a hole through the front so that my pump could slide under the seat a bit. Enter the drill and hole saw!!
 |
| Drilling through the seat. |
While not as dicey as drilling through the hull, you need to be careful when drilling out the seat. If your angle is wrong you can hit the hull beneath. Unknowingly I grazed my hull but certainly not enough to cause concern.
 |
| Finished hole (see the slight abrasion on the hull inside the lip?) |
I took a piece of sandpaper and cleaned up the burrs around the hole and moved the PVC holder into position.
 |
| After |
 |
| Before |
The pump is about 7" under the seat now and well out of the way of my feet/legs. The seat also serves to hold the pump a little more snug. Release and return are quite easy to perform.
Off to Greenland . . . by way of Brigus!!
Where: Brigus
When: November 13, 2010
Who: Cheryl, Tony, Julie, Gary, Dean and your's truly.
______________________________________________________________
The stars were in alignment for Cheryl and I - which means that we had our two kids farmed out for the day and were free to do a paddle somewhere. The season is winding down (for most people) so I wanted to get Cheryl out for one more paddle before the "really" cold weather set in. Wind direction suggested that we head out towards Conception Harbour. An email was sent around and a time and place were struck for the put-in. We met at the put-in but decided that, due to the increasing wind, we'd try another just up the shore - at Bacon Cove. Unfortunately that beach was not easily accessible.
Plan C. We decided to head to Brigus to see what the conditions would be like there. I have a fondness for Brigus. I've been visiting there every summer since birth - stopping at Bishop's Beach for a boil-up after an afternoon of picking blue/partridge berries in nearby Cupids. I still have relatives in the town and my family has been connected to the town for at least 100 years. A chance to paddle there was most welcome for me!!
It was 11:30 by the time we hit the water (about an hour later than planned) but the water and wind conditions in the bay were perfect!! It was worth the extra drive!!
 |
| Putting in at Bishop's Beach, Brigus |
There was ample parking at Bishop's Beach.
 |
| Putting in at Bishop's Beach, Brigus #2 |
And nice and close to the water as well. Certainly much closer/easier than what we contemplated back at Bacon Cove!!
 |
| Cheryl gearing up! |
 |
| Dean and Tony waiting near the rocks just off Bishop's Beach. |
 |
| Gary with the "new" Brigus in the background. |
Brigus is rapidly becoming a trendy place to live - much like Trinity in Bonavista Bay. Condos have sprung up on the harbour front were once there was a fish plant. Good in some ways but not in others. My Aunt owned a beautiful two story home that once looked right out the harbour. I noticed today that you can't even see this house from the water - the new condos have blocked it entirely. The Brigus in the picture above is not the Brigus I remember and love. When my Aunt died, her house was sold, for a song, to Americans. They promptly clad it in vinyl and put plastic, i.e., fake, shutters on the windows. What was once one of the most stately homes in the community now looks like an abomination!! Rant off!!
 |
| Julie and Gary heading towards Rockwell Kent's old cottage. |
Rockwell Kent was an American artist who inhabited a small cottage on the North side of Brigus. Apple and pear trees still grow on the property. It's truly a haven. Apparently poor ol' Rockwell had a had "go" of it Brigus when, during WW1, for some reason, he was labelled a German sympathizer. As far I know, the locals' fears were unfounded.
 |
| Cheryl steaming out the bay. |
 |
| Skirting the cliffs. |
 |
| Julie heading towards the headland. |
 |
| Cheryl keeping close to the rocks. |
 |
| Gary scoping out a narrow passage. |
As is often the case, when we paddle we look for tricky passages. Today was no exception. We encountered a few spots to test our skills. One in particular was quite interesting. Sorry, no pictures as it was not the place to be taking out and fooling around with a camera!!
 |
| The crew heading towards the lighthouse. |
 |
| Cheryl with Brigus lighthouse in the background. |
 |
| Playing in the clapotis. |
As we rounded the Northern headland, we encountered a good ocean swell - as evidenced by the amount of foam on the water.
 |
| Dining on the beach in Greenland. |
My Father, may he rest in peace, was born in a small community of Greenland - which lay between Brigus and Cupids. He moved out of there when he was 2. The community disappeared not long after that. To this day, you will find the stone basements of the houses but nothing else. It's almost as if the entire community just disappeared. I've visited Greenland many times "by land" via hiking, but have never gotten there by sea - until today. It was an amazing feeling to paddle in there and sit on that beach knowing that this was the first home of my father, my grand father etc ! Dawes have been in this area since the 17 century!!
 |
| Where once they stood, we stand! |
Having a father who was born in Greenland, is it no wonder that I've taken to the Greenland paddle so eagerly?? Interestingly enough, I get my wood working, i.e., paddle making, skills directly from my father. Can it get anymore "full circle" than this?
On our way up the coast, we pulled in behind this rock as there was a small "cove" in behind it. I pulled in close to the rock to ride the swells and currents. I laid my paddle across my cockpit and just bobbed about UNTIL a strong current and wave tipped me over - just like that I was over!! Foolishly my paddle was not in my hand so I could not brace!! Instinct said "roll over to the left, come up on the right" Unfortunately the water said differently. There was a strong movement of water under the surface that was pushing me in the opposite direction to the way I wanted to roll up. I went over and could not get my body/boat in the right position, i.e., upside down and vertical. Change of plan, while still under, switch my hands and come back up on the same side I went over on. It worked!!
 |
| Gary and Dean off the coast of Greenland. |
 |
| Heading back. |
 |
| Scene of the crime! |
After, Tony asked me if I did it on purpose. I like to practice rolls but generally not that close to rocks in a good swell. Cheryl was wondering why no-one was coming to my rescue until I popped back up. She thought I was going to do wet exit as she never thought of me doing a roll.
At the time I was not happy with my roll. Why did I not come up on the side I wanted? Why was I under longer than I wanted etc etc? After thinking about it, I am now very pleased with myself. OK, it was dumb to get caught off guard and go over. Still, I went over and tried to get myself in position to roll. The water said "no" so I had to "improvise". While underwater I had the wherewithal to say,"OK change of plan" and it worked. All that PLUS I had to come up on my offside!! I'm happy!!
 |
| Interesting rocks on the South side of the Brigus. |
 |
| Julie and Cheryl heading back in. |
 |
| Tony with Brigus in the background. |
 |
| Tony cruising by Molly's Island - just off Bishop's Beach. |
Thanks fellow paddlers for a great day on the water and for the chance to revisit a bit of my family heritage via means not available to me before, i.e., kayak!
Wednesday, November 10, 2010
A warm, sunny November day in Cape Broyle
Where: Cape Broyle
When: Novermber 7, 2010
Who: Julie, Clyde, Gary, Dean, Tony, Tobias, Neville, Hazen, Gerard and your's truly.
_______________________________________________________
The weekend of Nov 6-7 was certainly a weather anomoly for us here in Newfoundland. It was calling for warm temps all weekend but with higher winds on Saturday. Some fellow paddlers opted to go for a practice run on Saturday as the winds made for some fun conditions. I, on the other hand, had some work to attend to around the house - most notable was replacing some clapboard that I'd been neglecting since August!!! Cheryl and I had a fun afternoon working together in the warm sun and soft winds. It was a great way to spend an afternoon!!
Saturday evening an email went out saying that a group were heading to Cape Broyle on Sunday AM. It was too good an offer to refuse - and I'm certainly glad that I didin't!!
Nine of us met at the Food Ex in ay Bulls at 9:00. We then proceeded to Cape Broyle.
 |
| Putting in at Cape Broyle (L-R) Tony, Gary, Clyde, Dean and Hazen) |
 |
| Heading out along the North Shore. |
 |
| Tony with Fall colours in the background |
 |
| Clyde watching water cascade down the cliff. |
We stopped a moment to watch how the water in this small stream wended its convoluted way to the ocean.
 |
| Gary and Tobias checking out some small caves while Dean's bow looks on! |
The South shore is known for its numerous caves - ranging in size from small alcoves in the rock all the way up to massive clefts where several boats at a time can fit through!
 |
| Gerard skirting the cliff base. |
 |
| Tobias doing the same. |
 |
| Light at the end of the tunnel. |
Most caves are one-way affairs - go in, turn around and come back out - but there is one in Cape Broyle that allows you to pass all the way through. One end requires that you pick your way through a rock garden. Depending on the tide and swell, you may/may not be able to pass. The other end opens up as seen above. It's quite a feeling passing through that much rock in a small boat!!
 |
| Playing in the waterfall. |
Kayakers, for some reason, seem drawn to wateralls. If they are not stopping to take pictures of them, they are trying their best to get under them. Cape Broyle has at least two such falls that you can bring your boat directly under. There is another on a beach on the South shore that you can stand under - this one is fairly large.
 |
| Crusin' the South shore. (L-R) Julie, Clyde, Gary, Dean and Tony |
 |
| Beauty, eh? |
 |
| Beauty, eh? (#2) |
 |
| Sea stack. |
 |
| Neville and Gerard entering a massive cave. (Sorry for the poor picture quality but it's the only one of have of this cave) |
 |
| And this is what we found at the end. |
Another meter or so of water and you'd probably be able to make it all the way through!
 |
| A different world. |
The paddle ended where it started and after packing everything up, we hit the local restautrant for a cuppa and some more good natured bantering. Full circle!!!
Subscribe to:
Posts (Atom)