Saturday, October 23, 2010

Under Deck Hydration System - First Upgrade

In my last post I detailed the process I went through in making an under deck hydration system.  I did not like how the hose came straight up through the rubber grommet and then bent over. I already had a 90 degree elbow but did not put it on for the first iteration.

I decided to put in that 90 degree fitting tonight and it works just great.

Below is good picture of the entire through-deck and quick disconnect fitting.


I made sure that hole through the deck was large enough to allow the quick disconnect fitting to fit without having to take it all apart.


The 90 elbow makes for a much more compact setup!


Compared to . . .


THIS JUST IN . . . .


I didn't like the beige rubber grommet and attempting to paint it failed miserably so I dug out a black one and Voila!! Not only does it look better in black but it's even a lower profile!!

Sweet!!


Water, Water Everywhere and . . . all kinds to drink!!

For the past year or so I've been using a a Lexan water bottle hooked under the netting on the foredeck of my kayak. As of late, I've noticed my paddle hitting the bottle on every second stroke or so. I decided to pursue other options for water supply while paddling!!  I thought about carrying a hydration bladder on my front deck but then looked into some under deck options. After seeing Gnaryldog's system I decided to embark upon my own!

I decided that I only needed a bladder and not a complete hydration pack which would include protective pack and carrying straps. I went with the Platypus  Big Zip SL. It was available at the Outfitters,  local shop, for 23.00 and while only 1.8l, it was well within the capacity that I wanted!! This unit has a quick disconnect hose - see observations below.

After buying the bladder, the next challenge was figuring out how to attach it to the under deck of the boat. I've seen others who have used anchors held in place by adhesives such as epoxy but I'm not into that kind of commitment. As in many of my projects, I decided to go with 3" suction cups!!  No fuss, no muss, as I like to say. If they don't work, then just yank them out of there!!

Bladder and cups!!

I never throw anything way so naturally I had an old folding chair in the attic. It turned out to be a great "hammock" for my bladder (ewwwwww)


Just checking to see if a chair can become a hammock!!


 After dry testing the "hammock" in my boat, I discovered that, due the shape of my cockpit coaming, I'd need to, somehow, increase the size of the hammock opening to allow easy loading/unloading of the bladder. It was either release a suction cup or some other option.

I did not like the idea of releasing/re-attaching a cup, so, after much head scratching, I opted to put a zipper in the hammock.  I actually picked up the zipper at Walmart. I toyed with the idea of stitching in the zipper but decided to go with Aquaseal. I knew from previous projects that Aquaseal was more than enough for this application.
"Aquasealing" the zipper
I added plastic reinforcements to the corners!


Zipper and reinforcements in place

This is the first time I've used the Cotol accelerator with the Aquaseal. It cuts the cure time down DRAMATICALLY!!!  Two hours from initial tack to dry testing is much better than 18 hrs!!


I did not like the idea of simply running a hose through my deck. I opted to run the hose through a custom grommet that I made from a rubber stopper - compliments of a local brew shop! I cut/sanded a groove in the stopper to allow easier placement in the deck, yet was watertight!!

Gettin' in the groove!

Not painted but good to go!
Not wanting to go willy nilly and cut a hole in my deck I decided to have a test run on a piece of test plastic!!


Through "deck"

Above "deck"

Below "deck" - quick disconnect fitting
The test run on the Rubbermaid cover was a success!!

Below deck images are very hard to get (for me anyway) but here's what it all looks like.  That orange thing to the left is my pump - it still fits under there!!!  I should point out that the fore deck of my boat is VERY low. The height of the front coaming is only 12"! The fact that this unit actually fits in this small space is testimony to its compact nature!!


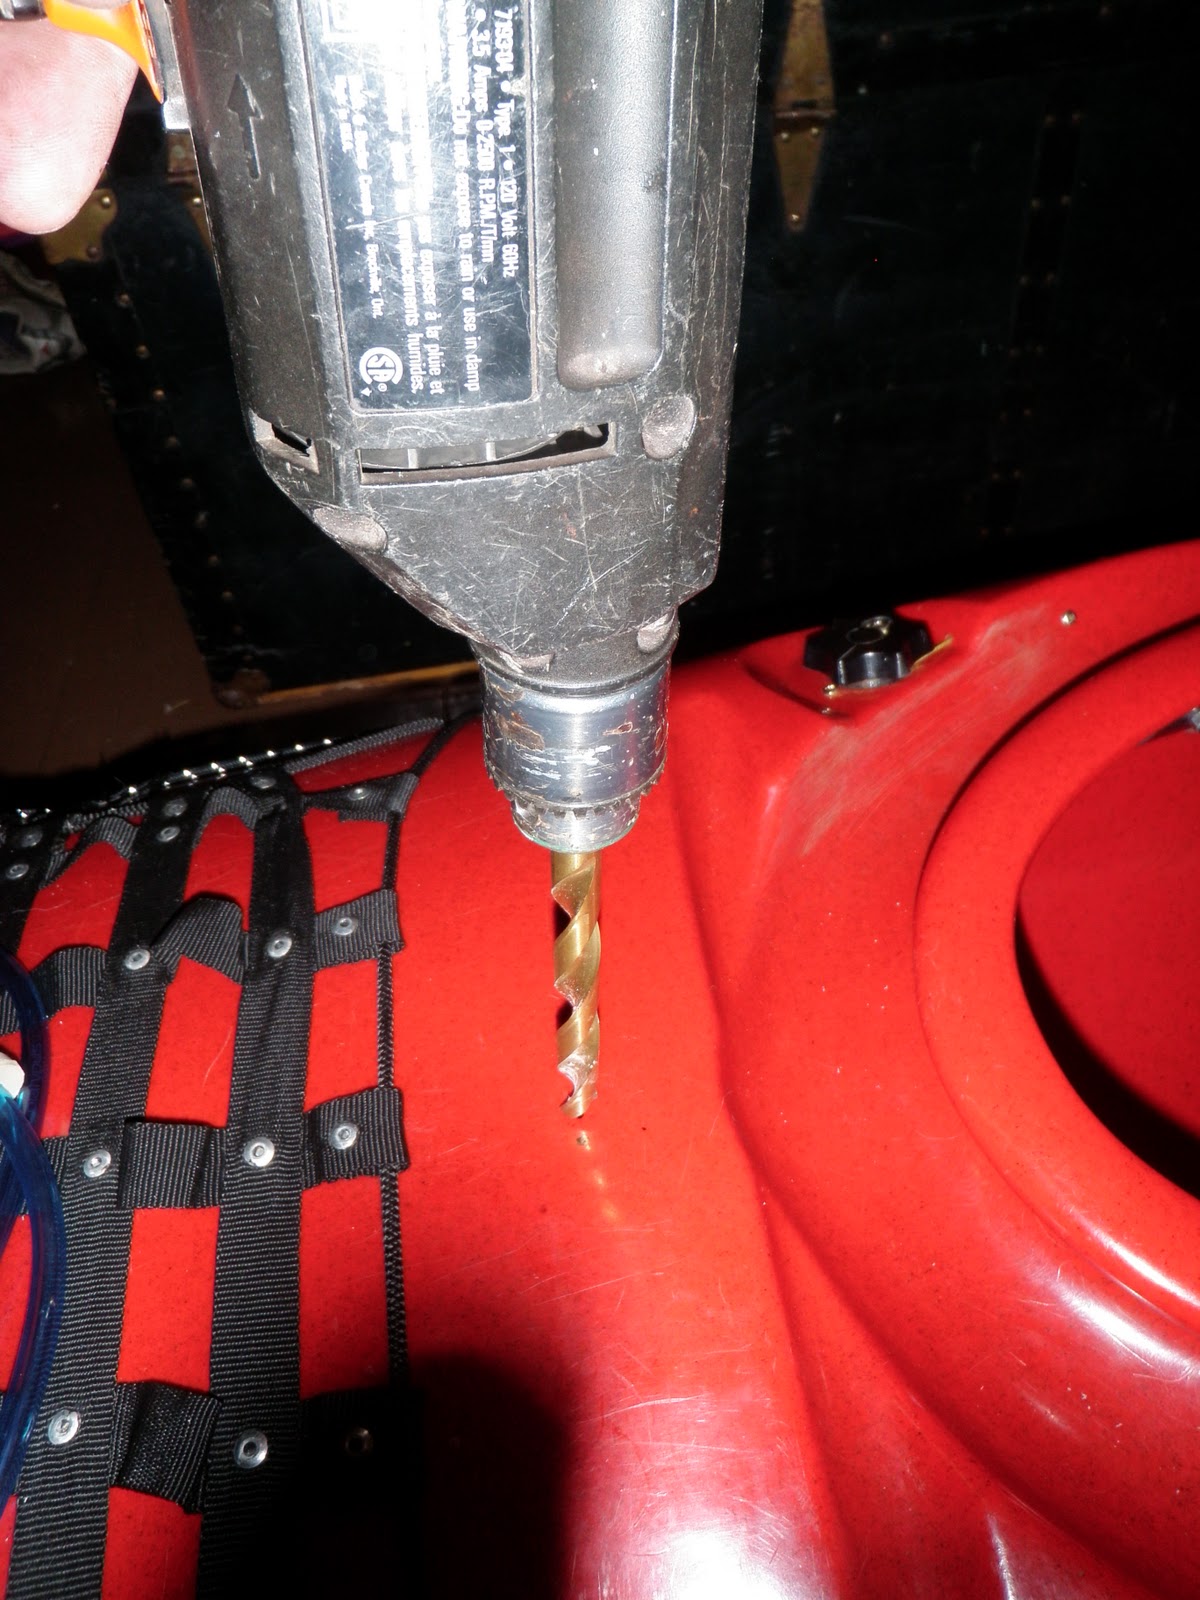
Drilling a hole in a perfectly good boat is still a bit unsettling. A good dose of "liquid courage", i.e. beer, does not hurt!!


We're goin' in!!

I initially drilled with a 1/2 bit and then reamed out the hole with a round file as well as a steel rod wrapped in sand paper. It was controlled and relatively painless - phew!!


After clean up but not yet painted black!

The result is a nice clean deck!!


Some observations:

The entire hose system can be removed from the boat. The quick disconnect on the bladder plus the rubber stopper on the deck allows the whole system to come out in one go. Pull the bladder and release the hose and the ENTIRE hydration system comes out of the boat!!

The zipper is a robust PLASTIC unit to resist corrosion.

The under deck housing of the hand pump is not affected.

This system is using space that is basically deemed "unusable"

While a PFD-mounted system could have been used a) this was cheaper, b) I find a PFD enough to carry on my back wihtout having a a few pounds of water and c)theoretically this puts the water at a lower C of G!!

Sunday, October 17, 2010

Three islands, one paddle. A pictorial account


When: October 17, 2010
Who:  Eugene, Tony, Dean, Clyde, Dennis, Gerard, Hazen and your's truly

Where: Conception Bay with a launch at Topsail Beach followed by stops at Little Bell Island, Bell Island and Kelly's Island
Total distance:  22.5 KM

ENJOY

Putting in @ Topsail Beach

Leaving Topsail and heading for Little Bell Island

Gerard heading for Little Bell Island


The lagoon on Little Bell Island

Rounding the Northern tip of Little Bell and heading towards Bell Island

Dean, Eugene, Gerard and Dennis heading towards Bell Island.

The cliffs of Bell Island

As good a place as any for lunch - Bell Island

Lunch on Bell Island

Stopping on the beach - Kelly's Island

Another lagoon but this time it's on Kelly's Island.

The "crew" on Kelly's Island
(l-r) Eugene, your's truly, Gerard, Clyde, Dean, Dennis, Hazen and Tony


Saturday, October 9, 2010

Lazy or . . . It Just Makes Damn Good Sense?


After some research I decided to devise/install an electric bilge pump on my kayak. The first question most people as is "Why? Isn't the hand held model good enough?" I thought it was until I looked into the electric version.

THE DEBATE:

Cons:
  • An electro/mechanical system is open to failure due the very nature of the setup - electrical components in a marine environment.
  • Battery drainage. A battery has a finite amount of life.
  • Weight.  The total system is about 5.00 lbs and takes up a certain amount of room in the boat.
  • The location of the outlet will spray in your face if you try a paddle float rescue while the pump is running.

Pros:

  • Requires no manual work from the paddler. Flip a switch and away she goes. Which means you can reenter your water-laden boat. Put on your spray skirt. Flip the switch and as you paddle, the boat automatically empties itself. In other words, no vulnerable downtime as you sit there with your skirt down (oo la la) trying to pump out your boat!!   Estimated times to empty a boat is 2-3 minutes - not bad!!
  • While it's electric, it's well protected from the water. In my setup the pump is the only part of the system that is in direct contact with any water. As the pump is designed for immersion, that is no issue - even as it sits in the cockpit. For double protection, the battery/electronics are house in a waterproof  Pelican case PLUS they are in the day hatch.  The switch is a non-conventional "jobbie" that I gleaned from Gnarlydog's blog. It's entirely impervious to water and there are no electrical components exposed to any elements. The "switch" on the rear deck bungee is unobtrusive as well, i.e, will not get hooked during scrambles or other rescue exercises. 
  • My battery is 4ah which means it should run the pump for about 1. 5 HOURS. @ 500 GPH. If you do the math, that's about 750 gallons of water. If I have to pump out 750 gal of water from my boat manually, then what's the point in even trying?!!
CONCLUSIONS

All precautions have been taken to mitigate the problems associated with electronics in a marine environment.  Battery and relay are in a watertight box in the day hatch. The reed switch is totally encased in epoxy. Pump is, by manufacture, completely sealed.

Battery life: If you need to pump for more than 1.5 hrs then you'd better rethink  your position.

A bag of sugar is about the same weight and size of the whole package (pump and battery pack). If you can't find room for a bag of sugar in your boat, then  . . . .?

As the pump may fail or the battery may die, a hand pump will always he stowed on board as well.


THE SPECIFICS:

Pump 500 GPH Johnson- 20.00
Battery Single Lead Acid (SLA) 12 volt  4   ah -  Free (already on hand)
Reed switch 6.00
Relay  10.00
Pelican case - Free (first prize in Safety Race)
Check Valve:  7.00
Suction cups: 15.00
Thru-full fitting: 3.00
Fuse/holder:  4.00
Misc fittings and sundry items: 20.00

THE PROCESS:

I'll admit that I relied heavily on the ideas of others to complete this project. I referred to Gnarlydog's blog entry quite extensively. 

In order to use the Pelican box I already had, I needed to remove the rubber liner so that the battery could fit, When you remove the liner you also remove the rubber seal. I had to make another seal out of neoprene I had lying around. It is self adhesive so I just cut a thin strip and set it around the lip of the box. Voila!!!

Waterproof testing the Pelican box.

One of the big problems experienced by others is the corroding of switches. Even waterproof ones had a habit of dying after a time in the marine environment. I decided to go with the magnetic switch. It simply required a reed switch (6.00) and magnetic "button" made out of a chair leg cap and a pair of rare earth magnets.

A reed switch is a tiny switch that relies on magnetism to activate it. The magnet moves the small reed inside and closes the circuit.  The trick is to encase the switch in epoxy to make it waterproof. I took a piece of rubber tubing cut down the middle. I placed the switch in the tubing and poured in the epoxy. The naturally occurring flat spot on top is great when you have to affix the switch to underside of the deck.

Reed switch


Reed switch encased in epoxy.

A reed switch is not powerful enough to power the pump, so you need to put a relay into the mix.

Battery, fuse and relay wired in.


The magnetic button is simply a chair leg cap with rare earth magnets. To hold the magnets in place you need to pour epoxy in around them. I left the magnets just slightly below the surface of the epoxy to provide protection from the salt water.

Switch button prior to pouring in the epoxy.


As my back deck is very low and often awash, I was concerned that the outlet would let in a lot of water = very dangerous. I found a check valve at Canadian Tire, It was intended for larger pipes so I had to step down the size to fit my 3/4' tubing. This valve is very free flowing yet jams air/water tight once the flow reverses.

Check Valve and Thru-hull fitting

The matter of attaching the pump was dealt with by using a 3" suction cup. I drilled a hole in the side of the pump and used the bolt from the cup to hold the pump. I placed a rubber washer on the inside to ensure watertightness. The suction cup holds the pump tightly to the bulkhead behind my seat. My bulkheads are foam and were starting dent in from the suction so I took a piece of thick sheet plastic and Aquasealed it onto the bulkhead. It holds incredible well and will not move until you break the suction.

Pump and suction cup.

The wires from the pump must run through the bulkhead. Aquaseal around the wires makes for watertight seal.

Dry testing the fit.

I decided to put the outlet on the rear deck simply because I did not want to run a long hose to the foredeck AND I wanted the hose as short as possible simply to keep the flow at a maximum. I painted the thru-hull fitting black with a plastic-specific enamel.

Thru-hull fitting painted and in place.
Many others have placed the magnetic button on their foredeck. I decided to go with the rear deck  simply because there was a short bungy cord all ready to go and because it meant all the wiring could be contained within the day hatch. It's very easy to reach so that is not an issue.  I placed a small twist tie as a stop to prevent the button from going to far. The button is small and unobtrusive and will not get in the way of any rear deck entries.

The reed switch assembly is held in place below deck right underneath the bungy cord. I initially toyed with the idea of epoxying the switch in place. Then I contemplated using small bolts. I finally decided to go with Gorilla Tape to hold the switch in place. This stuff is tenacious and I think it will work out great. If the test fails, then I'll resort back to my original plans.


Magnetic button

The matter of attaching the battery box in place was as tricky as the switch. I was planning on using industrial strength velcro but the self adhesive would not adhere well to the hull. I thought of glueing on straps as well. I finally decided to try the suction cups again. They are bolted directly to the box.  The box is then attached to the bottom of the hull. It holds very well and is easy to remove once you break the suction.


Pelican box with suction cups.

After tinkering with this over several evenings (while the boat sat in my living room!!) I was finally ready to give it a whir. I filled the boat up with water to a level I figured would be the most left after a reentry and roll. Fired up and pump and away she went. It took 3 minutes to empty. A very solid column of water comes out of the outlet and not a high spray that I was anticipating. The low arc is great because it is much less likely to catch the wind and blow all over you. It also means that a paddle float rescue can be done without feeling like you're being hosed down!!


Pump in action.

The amount of water left in the boat when suction stopped was less than what you'd have with a hand pump!!

Amount of water left after pump out.


And the check valve prevented any water from re-entering the boat. Perfect!!

Check valve works great!

 All in all, I am very pleased with this setup. It is small, relatively light yet it packs quite a bit of pumping punch!! I 'm really looking forward to trying it out on the water and in rescue practice.