| Stylistic rendition of paddle only!! |
It's been about six months since I last made a Greenland paddle. I figured enough time has passed.
This time I wanted to do something a little different. My current paddle has a small plastic, protective tip that has been working wonders. Some time ago I began toying with the idea of adding a plastic edge pretty much all the way around the paddle blade. The problem was that I was having a hard time finding a suitable material - something that was long enough, thin enough and flexible enough (with the aid of heat) to bend around the radius of the paddle tip. A few weeks back I found this very material - in the decking section of Home Depot, right next to the cedar I used to make the paddle. The plastic is white and is used for capping off lattice - go figure!!
After performing some tests with the plastic, I knew the project was "do-able".
As for the wood, one day I dropped by Home Depot to have a look at what cedar they had in stock. I came across this one peice that was, at one point, on the outside of the bundle. It had the telltale signs - dents from the metal strapping and the discolouration of the wood due to exposure to the sun and air. Of course it was also very dry. It had a split but not anywhere near where I needed to cut. It only had one little tiny knot. There was a slight bow but nothing that couldn't be worked around. To make a long story short, I got a great price on this "damaged" piece and only paid 8.00 for it. Did I mention that it had the perfect grain for making a solid paddle?? The best I've seen yet!!! I couldn't take it home with me right away because I had the small car. I tucked it away under a pile of other cedar with the intention of coming back later that evening. I almost didn't but I'm glad I did!!
So the parts are coming into place.
Why the name Newfoundland paddle, you ask? I liked the idea of taking a GP and somehow tweaking it for a particular purpse. This paddle has the added protection of Home Depot plastic lattice edging so that I can paddle amongst the rocks with less concern of damaging the blades. This paddle will also be better suited for rockhopping due to the increase in blade width (3.75 compared to my standard paddles of 3.5). The extra width will give more purchase on the water in tight situtations! While it is a GP-inspired design, I like the idea of creating our own unqiue padle and so I simply called it the Newfoundland paddle. I doubt that I will be sued for copyright infringment!!!
Now that I have you hooked, stay tuned for the building process and photos . . . .
As mentioned, the major obstacle I had with this project was finding the right plastic materials. I'd been looking for months with no luck. Finally, I found the Holy Grail. An $8.00 piece of lattice capping at Home Depot. I just had to rip it. Which was quite easy with a small hand saw.
The capping is solid plastic but bends easy when heated with hot water. Our domestic water is set at 160 degrees (ouch) to service our in floor heating so it was amply hot to bend the plastic. I'd simply hold the plastic under the stream while bending.
Next, I did some testing on a mock up tip to see what radius the plastic could handle.
The first attempts were successful with regards to the bending but not so with regards to the epoxy. The plastic was too slippery for the epoxy to get a good drip. Damn!! I did some research and found that I needed to prepare the plastic. I ended up sanding it with a rough paper, heating it with a torch and finally cleaning it with alcohol. These steps made a tremendous difference.
The next steps were your standard GP making process. Nothing to see here folks. Move along!!
The tips on this paddle are more "rounder" than my standard paddles due to the need to have the plastic bend smoothly with no gaps between it and the wood. I also had to pay very close attention to the shape as the plastic had to fit snugly. That's not to say I don't normally pay close attention to symmetry in my tips, it was just more crucial in this case.
As mentioned, the major obstacle I had with this project was finding the right plastic materials. I'd been looking for months with no luck. Finally, I found the Holy Grail. An $8.00 piece of lattice capping at Home Depot. I just had to rip it. Which was quite easy with a small hand saw.
 |
| Lattice Capping! |
The capping is solid plastic but bends easy when heated with hot water. Our domestic water is set at 160 degrees (ouch) to service our in floor heating so it was amply hot to bend the plastic. I'd simply hold the plastic under the stream while bending.
 |
| Bending the plastic |
Next, I did some testing on a mock up tip to see what radius the plastic could handle.
 |
| Testing |
 |
| Heating the plastic with a small butane torch |
The next steps were your standard GP making process. Nothing to see here folks. Move along!!
The tips on this paddle are more "rounder" than my standard paddles due to the need to have the plastic bend smoothly with no gaps between it and the wood. I also had to pay very close attention to the shape as the plastic had to fit snugly. That's not to say I don't normally pay close attention to symmetry in my tips, it was just more crucial in this case.
 |
| Shaping the tips. |
Now to test the fit of the "real" plastic on the "real" paddle. All was going according to plan!!
 |
| Testing the fit. Nice! |
I had to make up a gluing jig to hold the plastic in place. A few clamps, a piece of wood, a few nails and a piece of string and we're off to the races. I placed the nails close to the edge of the plastic then "laced" them up with string to pull them tighter. Worked like a charm. Note: Make sure you put plastic wrap UNDER the paddle or it will glue permanently to the jig!!.
 |
| Doing a little jig!!! |
 |
| Marking out! |
 |
| Shot in the rough! |
With the plastic attached, I was ready to do the second stages of marking out, i.e., the final shaping of the paddle faces and edges. I'll admit that the marking out stage is the only stage of paddle making that I DON'T enjoy. This paddle required some adaptation to the marking out process. Pencils do not mark on plastic so some of my lines had to be made with a Sharpie. Other than, it was par for the course!
 |
| Calculating - did the Inuit have to use a calculator? |
Final shaping of the paddle was pretty standard - even with the plastic edges. The plastic actually planed better than the wood. No images of the final shaping!
I was hoping to get out for a paddle so that I could give it a good soaking before doing the final sanding but it was not too be. So I wetted out the paddle with the hose. The images below show the paddle wet with water but not with tung oil - which is what I always use to finish my paddles.
 |
| After wetting out! |
 |
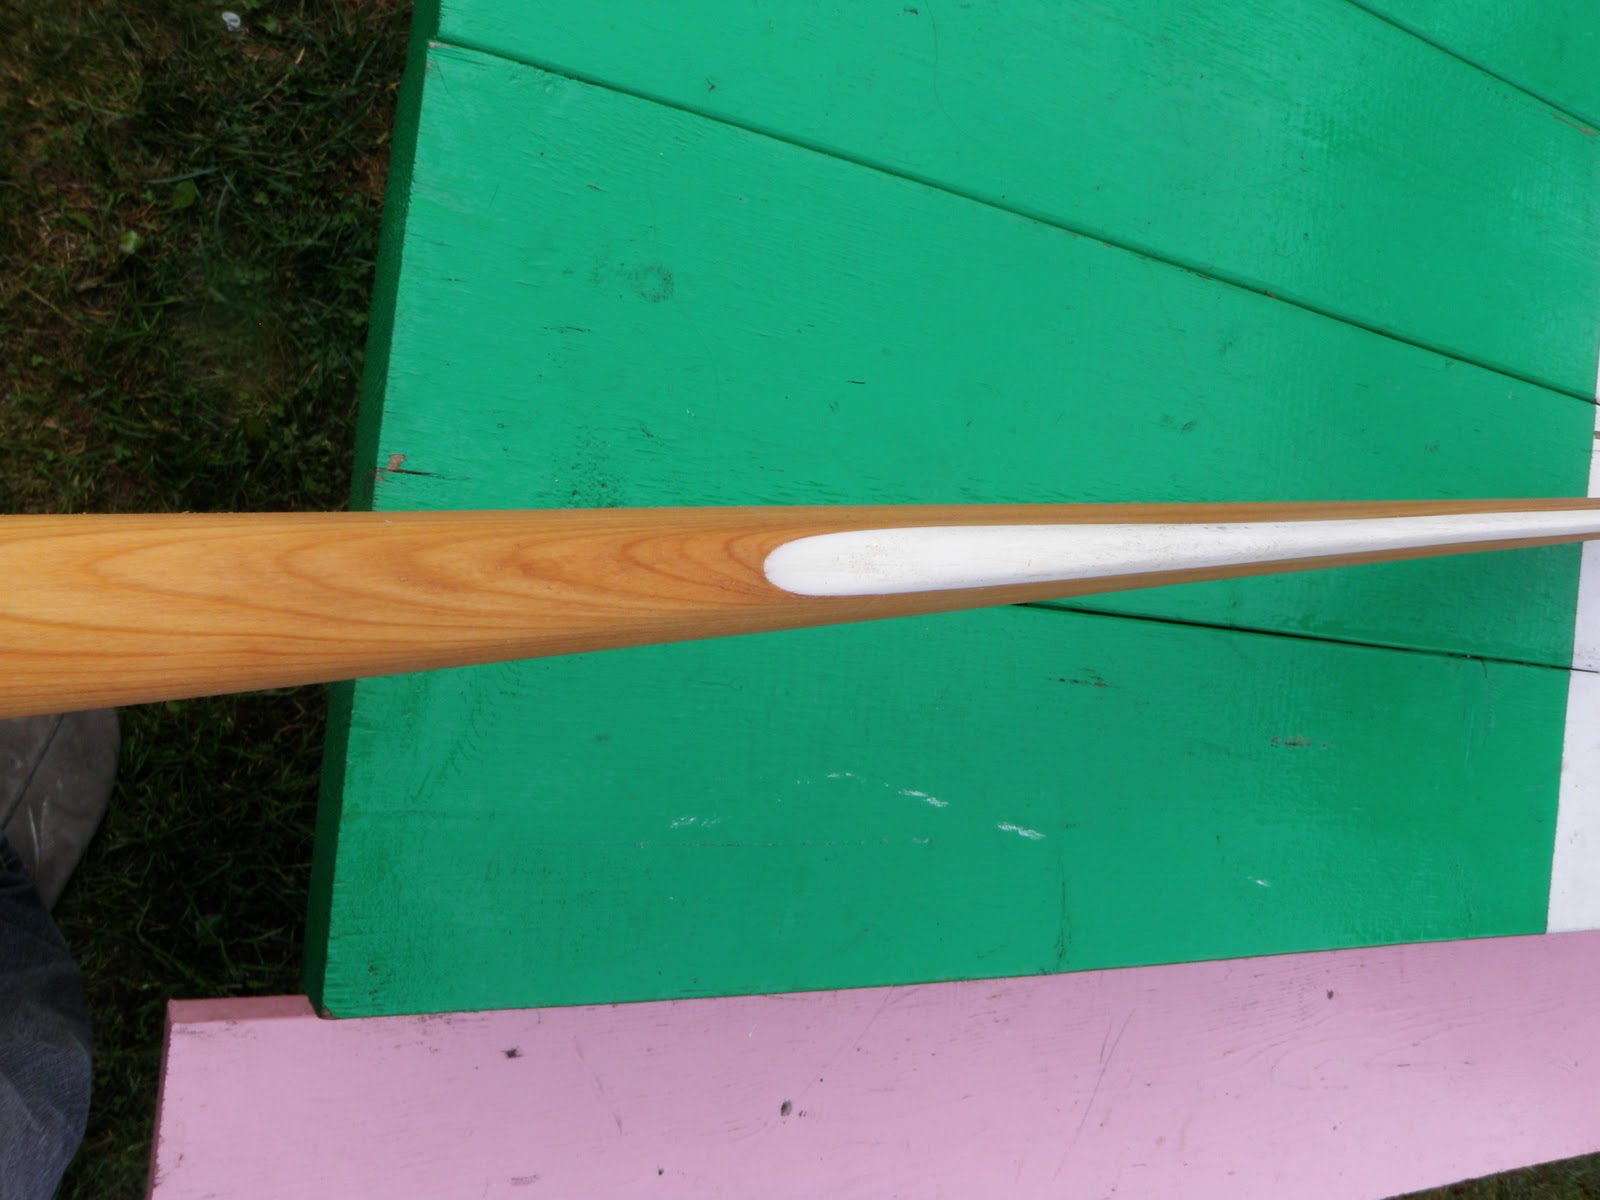
| Blade detail |
 |
| Tip detail |
 |
| In its natural element - the rocks |
 |
| Much neater than the image above (Shot in the rough), what? |

All in all, I'm very pleased with this paddle - even though I've yet to try it!! The proof will be in the pudding, as they say!
Particulars:
Length: 88"
Blade Max width: 3.75"
Loom: 22"
Loom Diameter: 1.5 x 1.125
Shoulders: Very soft
Weight: 31 oz
OMJ,hard to believe you've made another greenland paddle! Looks like a great job, looking forward to seeing the real thing. In the meantime, I think you may have an undiagnosed illness - at least a fixation *lol*
ReplyDeleteTony :-)
Looks like a nice job, Sean. Seems like if your not paddling your putting holes in your boat or your making GP's. I love it - the NGP, or to be politically correct, the NLGP. Bring it to the pool next time. I like how you made it just a little wider, makes sense for a rock-hopping GP. Maybe that will be the next one I make... keep the jig around in case.
ReplyDeleteThanks guys. I often have creative tendencies bottled up inside me and building GPs is a great outlet! As for the plastic, it was inspired by the Inuit paddles that had bone running almost the full length of the paddle. Seeing that bone is hard to come by and real stinky to cut and sand, I figured white plastic would be the next best thing! I'm thinking that the extra width is going to work out fine for all types of paddling and not just rockhopping. It'll definitely be at the next pool session.
ReplyDeleteCheers,
Sean
Sean,
ReplyDeleteWell done-process looks like an easier approach to getting the faux bone look than other methods. How did the poly carve out for you?
Scott Brown
Scott: The plastic planed easier than the wood. Unfortunately it does not sand very well. You are better off scraping the plastic to get a smooth edge.
ReplyDeleteHey, that's an awesome looking paddle! And much the same dimensions as what I use (88" x 20" loom). I'm not all that fond of working with epoxy myself (although I did make a couple of stitch and glue boats a while back) but looking at your beautiful design here, I'm certainly tempted. If my solid ash paddle starts wearing me down too much, maybe I'll take a stab at the Newfoundland Paddle.
ReplyDelete