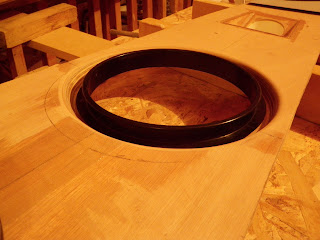
There's an old adage in woodworking (and boatbuilding) circles that you can never have too many clamps. My next task was the gluing the hatch spacers to the deck. This would require a substantial number of clamps if to be done correct. I'll admit that my clamp inventory is somewhat lacking. I have a few old c-clamps, some plastic spring clamps and a few bar clamps. And that's it. But, in Moores and Rossel book, Kayaks You Can Build, (rapidly becoming my Bible) they briefly discuss the use of clamps made from ABS pipe (Schedule 40 is stamped on the side, so hence the name) Simply cut a 3" pipe into 1" sections, then split the ring. The result looks like this:
Surprisingly, the ABS pipe really wants to retain its original shape so there is a fair bit of holding power. Of course, you are using a bigger number of these clamps which increases the holding power. Also, we're dealing with epoxy and a great deal of pressure is not required - lest we end up starving the join!!
$15.00 of pipe yielded 50 Schedule 40 clamps.
The first use of the new clamps was the gluing of the coaming lips to the spacers. As shown below.
The next step was one that I was both eagerly anticipating yet almost dreading!! I had to cut the holes in the deck for the hatches. I've cut holes in my plastic boat for both a bilge pump and an underdeck hydration system but nothing as drastic as cutting a 16x12 gaping hole!!! I followed the old rule of measure twice, cut once because a wrong cut would mean a MAJOR setback. My camera went missing during the cutting process but all went without incident. I left the holes a little small so that I could enlarge them in a more controlled manner as required.
I used the Schedule 42 clamps again when epoxying the spaces/lip to the underside of the deck. In the images below I only have a few clamps on each piece. I later doubled these amounts.
 |
| Rear and day hatch. |
 |
| Fwd hatch showing compass recess. |
 |
| That's a lot of clamps!! |
Since I was cutting holes for the hatches, I figured I'd do the compass recess while I was at it. Again the camera was AWOL but I do have pictures of the recess in place. Again, I cut the hole too small and used a rasp and sandpaper to slowly bring it to a perfect fit. I will fillet the underside for added strength.
I glued the spacers in on Sunday AM and left them for the day to dry. Later in the evening I decided to take the clamps off. Of course this lead to some "experimental" sanding and cutting to see how how hard it will be to get a neat looking job. It was not a daunting task at all. The 4 mm deck is easy to cut and shape. I set to the front hatch and after about 30 minutes I almost had a final product.
 |
| After some shaping. |
 |
| Coaming laid in place. |
 |
| Coaming and hatch laid in place. |
It was getting near bedtime for the rest of the family so I decided to lay off the sanding and call it a day. I wanted to get an idea of how the whole project was looking so I popped the deck back on the hull and here's what it looks like thus far. I'm a happy builder!!


That's what I meant by "not for the faint of heart" - cutting holes in the deck. Now, you do need time on the water!
ReplyDeleteTony :-)