Last night was supposed to see some good progress on my hatches and compass recess. As I've pointed out before, Duane Strosaker provides only the rudimentary intsructions for building this boat. His intent is to provide the builder with the hull and deck shape. The rest is for a) the builder to decide and b) the builder to come up with the process to make those decisions come to fruition.
I've decided to go with commercial rubber hatches because a) it's easier to install them than to make custom ones b) they are very watertight and c) I think they look better (but that's just me!!). I've seen pictures of other boats where the builders simply stuck the hatches on top of the deck. They stand out like chimney stacks from the deck of the boat. Not wanting that look nor the hatches getting in the way of rescues and such, I 've decided to go with recessed hatches.
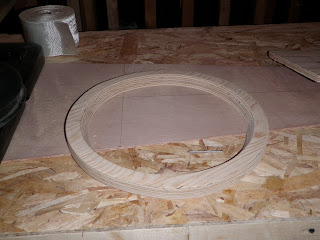
I'm going to use 3/4 plywood rings as spacers that will allow me to drop the hatches and have the tops just slightly above the deck. The spacers will be epoxied up under the deck. A lip of plwyood will be epoxied to the bottom of the spacer. The hatch coaming will be bolted to this lip. Here's what I came up with.

Having no plans means that there is a certain degree of trial and error. I ended up cutting three extra, i.e., WRONG, spacers before coming up with the one I liked. Initial tests had the sides up and down pefectly vertical. To do this meant that the opening had to be pretty big because you need to get your fingers in around the hatch to put it on/take it off. I toyed with the idea of bevelling the sides but I did not think that my jigsaw could accurately cut the sides at an angle. To to my delight, it cut smoother and with better control with the blade set at around a 35 degree angle.
After a few hours and lots of plywood dust, I finally came up with a spacer that was up to snuff.


Looks good so far. I've got a few ideas on what to put behind to ensure watertight integrity but have not made a final decision yet.


Thanks for dropping by!!
I've decided to go with commercial rubber hatches because a) it's easier to install them than to make custom ones b) they are very watertight and c) I think they look better (but that's just me!!). I've seen pictures of other boats where the builders simply stuck the hatches on top of the deck. They stand out like chimney stacks from the deck of the boat. Not wanting that look nor the hatches getting in the way of rescues and such, I 've decided to go with recessed hatches.
I'm going to use 3/4 plywood rings as spacers that will allow me to drop the hatches and have the tops just slightly above the deck. The spacers will be epoxied up under the deck. A lip of plwyood will be epoxied to the bottom of the spacer. The hatch coaming will be bolted to this lip. Here's what I came up with.

Having no plans means that there is a certain degree of trial and error. I ended up cutting three extra, i.e., WRONG, spacers before coming up with the one I liked. Initial tests had the sides up and down pefectly vertical. To do this meant that the opening had to be pretty big because you need to get your fingers in around the hatch to put it on/take it off. I toyed with the idea of bevelling the sides but I did not think that my jigsaw could accurately cut the sides at an angle. To to my delight, it cut smoother and with better control with the blade set at around a 35 degree angle.
After a few hours and lots of plywood dust, I finally came up with a spacer that was up to snuff.
 |
| The hatch will actually sit lower then this. |

While it took a while to create this one spacer, the rest will come quicker as I now know a) what dimensions are required and b) what cutting processes are to be followed.
Making the spacers brought me up to 11:00 but I still wanted to get to work on the compass recess. As I was making it out of 4mm plywood, I knew I could cut the materials with a razor blade knife and not make enough noise to keep people awake. Using a cardboard mockup I made the other night, I set to cutting. 4mm plywwod is not much harder to work with than stiff cardboard so cutting and fitting the pieces was not hard. I also have a 3.25" holesaw that was just the right size for the hole that compass back sits in. Initally I tacked the pieces together with a hot glue gun. Once I was satisfied with the fitting, I ran a fillet of thickened epoxy up the inside seams. It's a little bit rough righ now but once the epoxy sets I can get to work on making it look a little more "refined".


Looks good so far. I've got a few ideas on what to put behind to ensure watertight integrity but have not made a final decision yet.
As a side note, wooden boats generally have what is called an "end pour". This is where you fill the very tips of the stem and stern with epxoy. This not only adds strength but it also provides a secure place to run your toggles through. Most builders warn about putting too much epoxy in at the one time as it can possibly lead to heat build up during the curing process. Some suggest that you put in small batches at a time to reduce this problem. I've decided to kill two birds with one stone. What I do is simply dump in the epoxy that is left over after various jobs. This way it's put in small amounts and I don't waste any epoxy! Just another of the many tricks you pick up as you go!!

The last thing to do last night was run a strip of tape up the foredeck seam. By this time it was 12:30 and time for bed..

Thanks for dropping by!!
Very Nice Sean. Not long now!!
ReplyDeleteJust an idea for you about the compass recess. When I've built them, I backed with a custom fiberglass part built from a plaster-of-Paris mold. I wrote about the process in this builder's log: http://www.paddlinglight.com/articles/building-a-perfect-kayak-part-ten/
ReplyDeleteThanks Stan.
ReplyDeleteBryan: I just discovered that a cap for white 3" PVC pipe will fit perfectly. $1.75 plus a bit of epoxy and I'm good to go. I had already did some testing with making a custom part and was going to go that route until I happened upon the plastic cap. I also read your write up a few days ago when researching compass recesses - small world, what?
It is. I wish I would have known about your build sooner, I would have followed along. In the RSS now. Did you weigh the PVC cap?
ReplyDeleteThanks for tuning in Bryan. Still lots of work to be done!!
ReplyDeleteI did not weigh the cap but it's mere ounces - probably not much more than the glass/epoxy combo. I thought of the weight as well but when I lifted it, I knew that it would not be a real issue.
I just went back to re-read some of your build thread and noticed that you used the plywood spacers for the hatches and that you admitted that you like the rubber hatches more than the custom. Which is funny becuase I made that exact same statement in one of my entires just the other day!!
Almost all the custom hatches that I've seen leak and rubber hatches don't. That sells me on rubber hatches!
ReplyDeleteOn my last build, the Iggy, I used carbon fiber recesses which saved weight over wood recesses, but it was more work.